
User Manual


Operating Step
-
by
-
Step
Address Book
2
158 | 352 A6V10415471_en_a_40
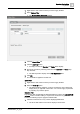
1. Click the drop-down arrow on any column displaying date/time data, for
example, Date/Time. A list of menu options displays.
2. Position your mouse pointer over Date Filters. A list of options to filter the data
on the basis of the current day (Today), previous day (Yesterday), current week
(This Week), previous week (Last Week), current month (This Month), previous
month (Last Month), current year (This Year), or previous year (Last Year)
displays.
3. Select the required option. The Detailed Log refreshes and displays the data
according to the selected time option.
Quick Filter
Perform the following step to apply a quick filter:
Right-click the data entry corresponding to the date time value for which you want
to apply the filter and select Filter By. The Detailed Log refreshes and displays the
entries corresponding to the selected date.
NOTE
:
The last three filters applied on a column are listed as menu options that display
when you right-click a data value. You can also apply a quick filter by selecting
any of these options.
2.8 Address Book
This section provides instructions for common tasks related to the Desigo CC
address book. For background information, see the reference [➙ 326] section.
Prerequisites:
● System Browser is in Application View.
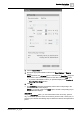
View the Address Book
1. In System Browser, select Applications > Address Book.
a The Address Book workspace displays a list of contacts.
2. To view the details of a contact, select the contact in the list.
a The Details expander displays all the information for that contact. For more
details, see Details of an Address Book Contact [➙ 328].
3. To search for a contact enter a string in the search field. For more details, see
Address Book Search Field [➙ 327].
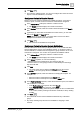
Create a New Contact
1. In the Address Book workspace, click Add recipient .
a A new contact is added to the list.
2. Select the newly-created contact.
a The Details expander displays fields for entering the contact’s information.
3. In the General expander, enter contact’s full name in the Full Name field (for
example, John Doe). This value has to be unique.
4.
(Optional)
Specify the following settings:
– Short Name
– Language
– Time Offset