
User Guide


15
System-related Functions
Print Feature
374
Siemens User Guide Version 2.1 A6V10415471_en_a_21
Building Technologies 2015-07-15
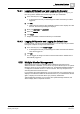
15.6.3 Printing from the Menu
1. In the Summary bar, select Menu > Print.
The Printouts selection dialog box displays.
If you want to terminate the printout selection operation and exit this dialog
box, click
Abort. In this case, skip the next steps.
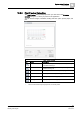
2. In the Printouts selection dialog box, do the following:
– Clear the check boxes that correspond to the system application(s)
printouts you don’t want to generate.
– Click Move up or Move down to change the printout order.
3. Click Preview.
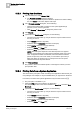
4.
(Optional)
In the Print Preview dialog box, do the following:
– Use the icons in the toolbar [➙ 373] to check the output to make sure it is
the way you want it.
– Adjust Margins (default is
50 pixels
).
– Select the desired Orientation (default is
Landscape
).
– Adjust Scaling (default is
fit to page
selected).
– Select the Printer and Paper size.
– Select the Color option (default is black and white).
NOTE: The color option depends on the selected printer. If it appears
dimmed and unselected, this means that the selected printer cannot print
color. If it appears dimmed and selected, this means that the selected
printer can print only color. Even when you can select to print color (or
black and white), the printout may not correspond to the color option
selected because of the printer drivers.
5. Click Print and Close.
The printout is sent to the selected printer. A message box informs you if the
print operation fails.
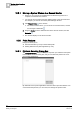
15.6.4 Printing Data from a System Application
The access to the print option varies according to the application selected and your
user privileges. For example, it may be available when you right-click on the Event
List window, but some other system applications may have the
Print
icon .
The print option is available to you.
Select the Print option as provided by the application.
For example, right-click on the column headers of
Event List, and select Print
Event List.
1.
(Optional)
In the Print Preview dialog box, do the following:
– Use the icons in the toolbar [➙ 373] to check the output to make sure it is
the way you want it.
– Adjust Margins (default is
50 pixels
).
– Select the desired Orientation (default is
Landscape
).
– Adjust Scaling (default is
fit to page
selected).
– Select the Printer and Paper size.