
User Guide


13
Address Book
Working with the Address Book
360
Siemens User Guide Version 2.1 A6V10415471_en_a_21
Building Technologies 2015-07-15
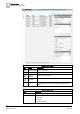
5. Click OK to close the message box.
The imported contacts appear in the Address Book.
WARNING
NOTE:
Only CSV files in English language are supported. If your language is not English,
change this setting to
English
before proceeding with the file import. For more
information about this procedure, see the following:
Microsoft Office 2003:
http://office.microsoft.com/en-gb/word-help/change-the-
default-language-setting-HP003088462.aspx
Microsoft Office 2007:
http://office.microsoft.com/en-us/support/change-the-
default-language-for-office-programs-HA010356057.aspx.
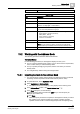
13.2.2 Adding a Contact
1. In System Browser, select Application View.
2. Select Applications > Address Book.
The address book user interface [➙ 357] displays in the Primary pane.
3. In the Address Book toolbar, click Add recipient .
A new row appears in the Address Book.
4. Select the new row.
The contact details fields are available for editing.
5. Enter the Full name and Short name.
6.
(Optional)
Select a Language different from the default (English (United
States)).
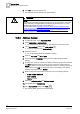
7. To assign the contact to a group of recipients, select the group from the list and
click Add. (Repeat this step for all the groups to which the contact belongs).
NOTE: To create a new group and assign the contact to it, enter the new group
name and then click Add. To change the name of an existing group, select it,
enter the new name and click Update.
8. Enter the appropriate information for at least one of the following devices:
– E-Mail 1/E-Mail 2/E-Mail 3
– SMS 1/SMS 2
– Number (pager).
9. Select the Preferred device and Fallback device.
10.
(Optional)
Enter the Contact data.
11. In the Address Book toolbar, click Save .
The contact details appear in the Address Book.