
User Guide


Trends
8
Analyzing Trend Data
211
Siemens User Guide Version 2.1
A6V10415471_en_a_21
Building Technologies 2015-07-15
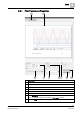
8.7.7 Selecting Time Range from Predefined Time Ranges
Select the visible time range based on predefined time ranges.
Time range
You are in an active Trend View.
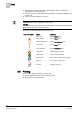
1. Move the mouse cursor to the time range slider (light grey area).
2. Right-click the time range slider.
Predefined time ranges display.
3. Select the desired time range.
The time range displays with the corresponding data period in the Trend
View.
NOTE:
The display calculation is always based on current visible date range.
Depending on the position of the current Trend View, the starting point may not
be at the start of the day.
Start/Stop Range
You are in an active Trend View.
1. In the Trend View, point the mouse to the left or right end point (dark grey area)
for the time range slider.
The mouse pointer changes shape and the tooltip displays.
2. Right-click the time range slider.
Predefined time ranges display.
3. Select the desired time range.
The time range displays with the corresponding data period in the Trend
View. The display calculation is always based on current visible date range
as displayed in the tooltip.
8.7.8 Using Comparative View
The comparative view is ideal for extended data analysis with time offset.
You are in a Trend View and Manual
mode is on.
The property window of the Trend View is closed.
The time period for display is defined using the time range scrollbar. For
example, 12 hours.
1. Click Stop .
2. Click Compare View to open a comparative view.
The same Trend View displays a second time.
3. Define the appropriate time/date range with the scrollbar.
4. Select time offset Forward or Backward .
5. Do one of the following: