
User Guide


Scheduler
7
Overview of Timeline Viewer
145
Siemens User Guide Version 2.1
A6V10415471_en_a_21
Building Technologies 2015-07-15
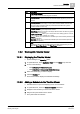
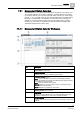
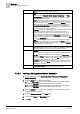
Item
Description
1
Time Range Scrollbar
Allows you to control the date range of schedules.
2
Schedule Name
Displays the name of the schedule with schedule details appearing on the row
below it.
3
Schedule Details
Hovering on an interval displays a tool tip with schedule details. Intervals also
use color coding and hatch marks to provide basic information at a glance.
Schedule details are view only.
4
Timeline Toolbar
Includes the following time-adjustment controls:
Show Today
: Allows you to return to today’s date and does not affect any preset
time period you have chosen.
Preset Time Periods
: Allows you to choose one of six viewing options: 12 hours,
1 day, 3 days, 1 week, 2 weeks, or 1 month.
Zoom In: Allows you to decrease the viewable span of the timeline (decrease the
preset time periods).
Zoom Out
: Allows you to increase the viewable span of the timeline (increase
the preset time periods).
5
Date
Displays the date you are currently viewing. The date changes when you use
either the
Preset Time Spans
or the
Time Range
scrollbar.
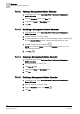
7.2.2 Working with Timeline Viewer
7.2.2.1 Displaying the Timeline Viewer
System Manager is in Operating mode
1. In System Browser, select Application View from the Views drop-down list.
2. Do one of the following:
– Click Schedules > BACnet Schedules.
– Click Schedules > Management Station Schedules.
3. Select the schedule(s) you want to display.
4. Click the Timeline tab.
The Timeline Viewer displays the selected schedule(s).
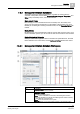
7.2.2.2 Adding a Schedule to the Timeline Viewer
Timeline Viewer is open and displaying one or more schedules.
1. In System Browser, check the Manual navigation check box.
2. Navigate to the schedule you want to add to the Viewer.
3. Drag-and-drop the schedule in the Viewer.
The system adds the schedule