
Operating instructions


Functions
5.11 Operation in fieldbus systems
CU240S and CU240E Control Units, FW 3.2
Operating Instructions, 03/2009, A5E02440075B AA
165
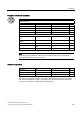
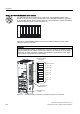
Set the DIP switch to address 10 (as shown in the following table).
Table 5- 75 Examples of setting the PROFIBUS address
DIP switch 1 2 3 4 5 6 7
Address = values added in this line 1 2 4 8 16 32 64
Example 1:
Address = 117 = 1 + 4 + 16 + 32 + 64
OFF
ON
Example 2:
Address = 39 = 1 + 2 + 4 + 32
OFF
ON
The valid address range is specified in the table below:
Table 5- 76 Valid PROFIBUS addresses
DIP switch settings Significance
0 PROFIBUS address defined via P0918
1 … 125 Valid PROFIBUS address
126, 127 Invalid PROFIBUS address
Integrating the inverter into a higher-level SIMATIC control
Once you have set the PROFIBUS address of the inverter, all the remaining settings
required for integrating it in the SIMATIC control are carried out in STEP 7 with HW Config.
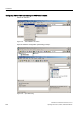
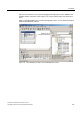
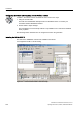
Creating a STEP 7 project
Create a new STEP 7 project and assign a project name (e.g. "G120_in_S7").
Figure 5-23 Create a new project in STEP 7
352),%86
352),%86