Built-in oven CM633GB.
en Table of contents no i t cur t sen I 8 Intended use . . . . . . . . . . . . . . . . . . . . . . . . . . . . . 4 ( Important safety information . . . . . . . . . . . . . . . 4 General information . . . . . . . . . . . . . . . . . . . . . . . . . . . 4 Microwave . . . . . . . . . . . . . . . . . . . . . . . . . . . . . . . . . . 5 ] Causes of damage . . . . . . . . . . . . . . . . . . . . . . . . 6 General information . . . . . . . . . . . . . . . . . . . . . . . . . . . 6 Microwave . . . . . . . . . .
en Intended use Additional information on products, accessories, replacement parts and services can be found at www.siemens-home.com and in the online shop www.siemens-eshop.com (Important safety information General information no i t amro f n i y t e f as t na t ropmI 8Intended use Read these instructions carefully. Only then will you be able to operate your appliance safely and correctly. Retain the instruction manual and installation instructions for future use or for subsequent owners.
Important safety information : Warning – Risk of injury! Scratched glass in the appliance door may develop into a crack. Do not use a glass scraper, sharp or abrasive cleaning aids or detergents. Risk of injury! ■ The hinges on the appliance door move when opening and closing the door, and you may be trapped. Keep your hands away from the hinges. ■ : Warning – Risk of electric shock! Incorrect repairs are dangerous.
en Causes of damage : Warning – Risk of scalding! There is a possibility of delayed boiling when a liquid is heated. This means that the liquid reaches boiling temperature without the usual steam bubbles rising to the surface. Even if the container only vibrates a little, the hot liquid may suddenly boil over and spatter. When heating, always place a spoon in the container. This will prevent delayed boiling. : Warning – Risk of injury! Unsuitable ovenware may crack.
Environmental protection Microwave Caution! ■ Creation of sparks: Metal – e.g. a spoon in a glass – must be kept at least 2 cm from the cooking compartment walls and the inside of the door. Sparks can irreparably damage the glass on the inside of the door. ■ Combining accessories: Do not combine the wire rack with the universal pan. Sparks may be created if they are inserted directly on top of one another. Only insert them into their own shelf level.
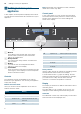
en Getting to know your appliance *Getting to know your appliance Note: Depending on the appliance model, individual details and colours may differ. In this chapter, we will explain the displays and controls. You will also find out about the various functions of your appliance. In the control panel, you can use the various buttons, touch fields and the rotary selector to set the required function of the appliance. The current settings are shown in the display.
Getting to know your appliance en Progress line The progress line is under the status bar. The progress line shows you how much time has elapsed, for example. The line over the in-focus value progresses from left to right, the longer the operation continues to run. Note: Due to thermal inertia, the temperature displayed may be slightly different to the actual temperature inside the oven. You can use the ² button to check the current heating temperature when heating up.
en Accessories 4 Hot air grilling + 90 W 30-300 °C 4 Hot air grilling + 180 W 30-300 °C 4 Hot air grilling + 360 W 30-300 °C -------- For roasting poultry, whole fish and larger pieces of meat. The grill heating element and the fan switch on and off alternately. The fan circulates the hot air around the food. For roasting poultry, whole fish and larger pieces of meat. The grill heating element and the fan switch on and off alternately. The fan circulates the hot air around the food.
Accessories en Inserting accessories Optional accessories The cooking compartment has three shelf positions. The shelf positions are counted from the bottom up. You can buy optional accessories from the after-sales service, from specialist retailers or online. *You will find a comprehensive range of products for your appliance in our brochures and online. Both availability and whether it is possible to order online differ between countries. Please see your sales brochures for more details.
en Before using for the first time Glass roasting dish (5.1 litres) For stews and bakes. Particularly suitable for the "Meals" operating mode. Glass tray For large roasts, moist cakes and bakes. Glass tray For bakes, vegetable dishes and baked goods. Decorative trims For concealing the lower shelf of the unit and the base of the appliance.
Operating the appliance Note: You can specify which operating modes should appear after the appliance is switched on in the basic settings. Switching off the appliance Use the On/Off button to switch off the appliance. The lighting above the button goes out. A set function is cancelled. The time appears in the display. Note: You can set whether or not the time should be displayed when the appliance is switched off in the basic settings.
en ■ Time-setting options You can use the l button to check the current cooking compartment temperature during rapid heating. Cancelling Press the c button. The c symbol disappears from the display. OTime-setting options Your appliance has different time-setting options. sno i t po gn i t es -emi T Time-setting option Timer Q + Cooking time * End Use The timer functions like an egg timer. An audible signal sounds once the set time has elapsed. A signal sounds once a set cooking time has elapsed.
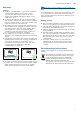
Childproof lock End time If you change the end time, please remember that easily spoiled foods must not be allowed to remain in the cooking compartment for too long. Prerequisite: The selected operation has not already begun. A cooking time has been set. The time-setting options menu 0 is open. Example in the picture: You put the dish in the cooking compartment at 9:30. It takes 45 minutes to cook and will be ready at 10:15, but you would like it to be ready at 12:45 instead. 1.
en Microwave Display brightness Can be adjusted to one of five different levels Clock display Digital Off Lighting On during operation Off during operation Continue automatically When closing the door Do not continue automatically (press the Stop/Start button) Operation after switching Main menu on Types of heating Microwave Microwave combination Dishes* Night-time dimming Switched off Switched on (display dimmed between 10 p.m. and 5.59 a.m.
Microwave en Accessories included Only the wire rack provided is suitable when using the microwave only. If you use the universal pan or the baking tray, this may create sparks, which may damage the cooking compartment. When using the appliance in combination with the microwave or "Dishes" mode, you can use the universal pan, baking tray or any other accessories that have been included with the appliance. When using the microwave, it is best to insert accessories at level 1, unless otherwise specified.
en Cleaning agent Open the appliance door for a few minutes until the cooking compartment is completely dry. DCleaning agent With good care and cleaning, your appliance will retain its appearance and remain fully functioning for a long time to come. We will explain here how you should correctly care for and clean your appliance.
Rails Notes ■ Slight differences in colour on the front of the appliance are caused by the use of different materials, such as glass, plastic and metal. ■ Shadows on the door panels, which look like streaks, are caused by reflections made by the interior lighting. ■ Enamel is baked on at very high temperatures.This can cause some slight colour variation. This is normal and does not affect operation. The edges of thin trays cannot be completely enamelled. As a result, these edges can be rough.
Appliance door en The rails fit both the left and right sides. 4. Open the appliance door again slightly. Put the 1. Hold the rear of the frame at an angle, and mount it at the top and bottom ‚ (fig. !). 2. Pull the rail forwards (fig. "). 1 D cover back in place and press on it until it clicks audibly into place (fig. #). 2 D 5. Close the appliance door. 3. Then fold it forwards and insert it (fig. #) 4. and push it downwards (fig. $).
Appliance door 6. Push both retainers at the top of the intermediate panel upwards, but do not remove them (fig. %). Hold the panel with one hand. Take out the panel. 3. Insert the front panel downwards into the retainers (fig. #). 4. Close the front panel until both upper hooks are opposite the opening (fig. $). Clean the panels with glass cleaner and a soft cloth. : Warning – Risk of serious damage to health! If the screws are loosened, the safety of the appliance can no longer be guaranteed.
en Trouble shooting 3Trouble shooting information. ~ "Tested for you in our cooking studio" on page 24 If a fault occurs, there is often a simple explanation. Before calling the after-sales service, please refer to the fault table and attempt to correct the fault yourself.
Customer service 4Customer service Our after-sales service is there for you if your appliance needs to be repaired. We will always find an appropriate solution, also in order to avoid after-sales personnel having to make unnecessary visits. ec i v res remo t suC E number and FD number When calling us, please give the full product number (E no.) and the production number (FD no.) so that we can provide you with the correct advice.
en Tested for you in our cooking studio Dishes Beef olives Steam fish fillet Vegetables, fresh Vegetables, frozen Baked potatoes, whole Boiled potatoes Long grain rice Defrost poultry portions Defrost meat Defrost fish fillet Applying settings for dishes You will be guided through the entire setting process for your chosen food. Always touch the ¿ arrow. 1. Press the menu button. 2. Use the rotary selector to select "Dishes". 3. Touch the ¿ arrow.
Tested for you in our cooking studio settings tables will be reduced. The cake will not brown as much underneath. Baking in combination with a microwave is only possible on one level. Shelf positions Use the indicated shelf positions. Baking on one level When baking on one level, use the following shelf position: ■ Level 1 Baking on two levels Use 4D hot air. Baked items that are placed into the oven on trays or in baking tins/dishes at the same time will not necessarily be ready at the same time.
en Tested for you in our cooking studio Dish Accessories/cookware Fruit tart or cheesecake with shortcrust pastry base Swiss flan Springform cake tin, diameter 26 cm 1 : 160-180 MW power in Cooking watts time in mins.
Tested for you in our cooking studio en Dish Accessories/cookware Shelf posi- Type of tion heating Temperature in °C Meringue Baking tray 2 80-90* MW power in Cooking watts time in mins. 120-150 Meringue, 2 levels Universal pan + baking tray 3+1 80-90* - 120-180 Macaroons Baking tray 2 90-110 - 20-40 Macaroons, 2 levels Universal pan + baking tray 3+1 90-110 - 20-40 : : : : * Preheat ** Preheat for 5 mins.
en Tested for you in our cooking studio Bread and rolls Your appliance offers you a range of heating types for baking bread and rolls. You can find the ideal settings for many dishes in the settings tables. Also refer to the notes in the section on allowing dough to rise. Only use original accessories supplied with your appliance. These have been tailored to the cooking compartment and the operating modes of your appliance. Shelf positions Use the indicated shelf positions.
Tested for you in our cooking studio en Dish Accessories Shelf posi- Type of tion heating Temperature in °C/ grill setting Multigrain bread, 1.5 kg Universal pan or cake tin 1 : Wholemeal bread, 1 kg Universal pan 1 : Flatbread Universal pan 1 : 210-220* 180-190 210-220* 180-190 220-240 Cooking time in mins.
en Tested for you in our cooking studio Universal pan or baking tray Slide the universal pan or the baking tray in carefully as far as the limit stop with the bevelled edge facing the appliance door. Use the universal pan for pizzas with many toppings. Baking tins Dark- coloured metal baking tins are most suitable. Tinplate baking tins, ceramic dishes and glass dishes extend baking time and mean that the baked item will not brown evenly.
Tested for you in our cooking studio Bakes and soufflés Your appliance offers a range of heating types for preparing bakes and soufflés. You can find the ideal settings for many dishes in the settings tables. Only use original accessories supplied with your appliance. These have been tailored to the cooking compartment and the operating modes of your appliance. en facing the appliance door, and the outer rail facing downwards.
en Tested for you in our cooking studio Poultry Your appliance offers you a range of heating types for preparing poultry. You can find the ideal settings for certain dishes in the settings tables. Roasting on the wire rack Roasting on the wire rack is particularly well suited for larger poultry or for multiple pieces at the same time. Slide the wire rack in at the indicated shelf position with the imprint "Microwave" facing the appliance door and the outer rail facing downwards.
Tested for you in our cooking studio ■ ■ ■ If using duck breast, score the skin. Do not turn duck breasts. When you turn poultry, ensure that the breast side or the skin side is underneath at first. Poultry will turn out particularly crispy and brown if you baste it towards the end of the roasting time with butter, salted water or orange juice. en Remove unused accessories from the cooking compartment. This will achieve the best possible cooking results and energy savings of up to 20 per cent.
en Tested for you in our cooking studio Meat Your appliance offers you many heating types for preparing meat. You can find the ideal settings for many dishes in the settings tables. Roasting and braising Baste lean meat with fat as required or cover it with strips of bacon. Score the rind crosswise. If you turn the joint when cooking, ensure that the rind is underneath at first. When the joint is ready, turn off the oven and allow it to rest for another 10 minutes in the cooking compartment.
Tested for you in our cooking studio Use tongs to turn the pieces of food you are grilling. If you pierce the meat with a fork, the juices will run out and it will become dry. Do not add salt until after the meat has been grilled. Salt draws water from the meat. You can find information on roasts and default values for weights in the table. If you wish to roast a heavy joint of meat, you should definitely use a lower temperature.
en Tested for you in our cooking studio Dish Accessories/cookware Shelf posi- Type of tion heating Temperature in °C/ grill setting Burger, 3-4 cm thick**** Wire rack 2 ( 3 MW power in Cooking watts time in mins. 20-30 Veal Joint of veal, 1.5 kg Cookware, uncovered 1 160-170 - 100-120 Joint of veal, 1.5 kg Cookware, covered 1 200-210 90 70-80 Knuckle of veal, 1.
Tested for you in our cooking studio Fish Your appliance offers you a range of heating types for preparing fish. You can find the ideal settings for many dishes in the settings tables. The whole fish does not have to be turned. Place the whole fish into the cooking compartment in swimming position with the dorsal fin facing upwards. Placing half a potato or a small oven-proof container in the stomach cavity of the fish will provide stability.
en Tested for you in our cooking studio Types of heating used: ■ : 4D hot air ■ 4 Circulated air grilling Dish ■ ■ Accessories/cookware ( Grill, large area Ý Microwave Shelf posi- Type of tion heating Temperature in °C/ grill setting MW power in Cooking watts time in mins. Fish Fish, grilled, whole 300 g, e.g. trout Cookware, uncovered 1 170-190 - 20-30 Fish, grilled, whole 300 g, e.g. trout Wire rack 2 230-250 90 15-20 Fish, braised, whole 300 g, e.g.
Tested for you in our cooking studio Stir or turn the food two to three times during this time. After heating up the food, leave it to rest for two to three minutes to compensate for the temperature difference. The food transfers heat to the cookware. It can become very hot when only using a microwave for cooking. en far as the limit stop with the bevelled edge facing the appliance door. Greaseproof paper Only use greaseproof paper that is suitable for the selected temperature.
Tested for you in our cooking studio en Dish Accessories/cookware Shelf posi- Type of tion heating Temperature in °C/ grill setting Chips, 500 g Universal pan 1 250-270 Chips, 2 levels (turn during cooking) Universal pan + baking tray 3+1 4 : MW power in Cooking watts time in mins.
Tested for you in our cooking studio en : Warning – Risk of burns! Microwave popcorn Use flat, heat-resistant glass cookware, e.g. the lid of an ovenproof dish. Do not use porcelain or heavily curved plates. Place the popcorn bag onto the cookware with the labelled side facing downwards. Use the settings indicated in the table. The time may need to be adjusted, depending on the product and quantity in question. Airtight packaging may burst when food is heated.
en Tested for you in our cooking studio Type of heating used: ■ ‘ Hotair Eco Dish Accessories/cookware Shelf posi- Type of tion heating Temperature in °C Cooking time in mins.
Tested for you in our cooking studio Recommended setting values In the table, you can find settings for drying various foodstuffs. The temperature and cooking time are dependent on the type, moisture, ripeness and thickness of the food to be dried. The longer you leave the food to be dried, the better it will be preserved. The thinner the slices are, the quicker the drying process en will be and the more aromatic the dried food will remain. Setting ranges are indicated for this reason.
en Tested for you in our cooking studio Type of heating used: ■ : 4D hot air Dish Cookware Shelf posi- Type of tion heating Temperature in °C Cooking time in mins. Preserving Vegetables, e.g. carrots 1-litre preserving jars 1 : Vegetables, e.g. cucumbers 1-litre preserving jars 1 : Stone fruit, e.g. cherries, damsons 1-litre preserving jars 1 : Pomes, e.g.
Tested for you in our cooking studio en Dish Accessories/cookware Shelf posi- Type of tion heating MW power in Cooking watts time in mins. Meat and poultry Chicken, whole, 1.2 kg* Cookware, uncovered 1 Ý Poultry portions, 250 g* Cookware, uncovered 1 Ý Duck, 2 kg* Cookware, uncovered 1 Ý Whole pieces of meat, e.g. joint (raw meat), 800 g Cookware, uncovered 1 Ý Whole pieces of meat, e.g. joint (raw meat), 1 kg* Cookware, uncovered 1 Ý Whole pieces of meat, e.g. joint (raw meat), 1.
en Tested for you in our cooking studio Heating food in a microwave Using the microwave, you can heat food, or defrost and heat it in a single step. Take ready-to-eat meals out of the packaging. The food will heat up more quickly and evenly in cookware that is suitable for microwaves. The various components of a dish may require different times to heat up. Food which lies flat will cook more quickly than food which is piled high. Arrange the food as flat as possible in the cookware for this reason.
Tested for you in our cooking studio en Dish Cookware Shelf posi- Type of tion heating Side dishes, e.g. pasta, dumplings, potatoes, rice Bakes, 400 g, e.g. lasagne, potato gratin Cookware, covered 1 Ý MW power in Cooking watts time in mins. 600 5-10 Cookware, uncovered 1 Ý 600 5-10 Dishes, frozen Plated meal, 1 portion Cookware, covered 1 600 11-15 Soup, stew, 200 ml (stir well) Cookware, covered 1 1000 2-4 Side dishes, 500 g, e.g. pasta, dumplings, potatoes, rice Bakes, 400 g, e.
en Tested for you in our cooking studio Grilling Also slide in the universal pan. The liquid will be caught and the cooking compartment stays cleaner. Type of heating used: ■ ( Grill, large area Dish Accessories Shelf posi- Type of tion heating Grill Cooking setting time in mins.
6
6
%6+ +DXVJHUlWH *PE+ &DUO :HU\ 6WU 0QFKHQ *(50$1< VLHPHQV KRPH FRP .