Built-in oven HB673G0.1A siemens-home.
en Table of contents no i t cur t sen I 8 Intended use . . . . . . . . . . . . . . . . . . . . . . . . . . . . . 4 ( Important safety information . . . . . . . . . . . . . . . 4 General information . . . . . . . . . . . . . . . . . . . . . . . . . . . 4 Halogen lamp. . . . . . . . . . . . . . . . . . . . . . . . . . . . . . . . 5 Cleaning function . . . . . . . . . . . . . . . . . . . . . . . . . . . . . 5 ] Causes of damage . . . . . . . . . . . . . . . . . . . . . . . . 6 F Sabbath mode . . . . . . .
en Intended use 8Intended use Read these instructions carefully. Only then will you be able to operate your appliance safely and correctly. Retain the instruction manual and installation instructions for future use or for subsequent owners. This appliance is only intended to be fully fitted in a kitchen. Observe the special installation instructions. Check the appliance for damage after unpacking it. Do not connect the appliance if it has been damaged in transport.
Important safety information ■ Water in a hot cooking compartment may create hot steam. Never pour water into the hot cooking compartment. : Warning Risk of injury! Scratched glass in the appliance door may develop into a crack. Do not use a glass scraper, sharp or abrasive cleaning aids or detergents. Risk of injury! ■ The hinges on the appliance door move when opening and closing the door, and you may be trapped. Keep your hands away from the hinges.
en Causes of damage ]Causes of damage General information egam d f o sesuaC Caution! ■ Accessories, foil, greaseproof paper or ovenware on the cooking compartment floor: do not place accessories on the cooking compartment floor. Do not cover the cooking compartment floor with any sort of foil or greaseproof paper. Do not place ovenware on the cooking compartment floor if a temperature of over 50 ºC has been set. This will cause heat to accumulate.
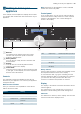
Getting to know your appliance en *Getting to know your appliance Note: Depending on the appliance model, individual details and colours may differ. In this chapter, we will explain the displays and controls. You will also find out about the various functions of your appliance. In the control panel, you can use the various buttons, touch fields and the rotary selector to set the required function of the appliance. The current settings are shown in the display.
en Getting to know your appliance Progress line The progress line is under the status bar. The progress line shows you how much time has elapsed, for example. The line over the in-focus value progresses from left to right, the longer the operation continues to run. The colour of the progress line changes depending on the operating mode.
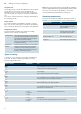
Accessories en ; Pizza setting 30-275 °C $ , Bottom heating 30-250 °C CoolStart function 30-275 °C -------- For preparing pizza and dishes which require a lot of heat from underneath. The bottom heating element and the ring heating element in the back panel heat up. For cooking in a bain marie and for the final baking stage. The heat is emitted from below. For the quick preparation of frozen products on level 3. The temperature depends on the manufacturer's instructions.
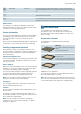
en Accessories Inserting accessories The cooking compartment has five shelf positions. The shelf positions are counted from the bottom up. Locking function The accessories can be pulled out approximately halfway until they lock in place. The locking function prevents the accessories from tilting when they are pulled out. The accessories must be inserted into the cooking compartment correctly for the tilt protection to work properly.
Before using for the first time Optional accessories You can buy optional accessories from the after-sales service, from specialist retailers or online. *You will find a comprehensive range of products for your appliance in our brochures and online. Both availability and whether it is possible to order online differ between countries. Please see your sales brochures for more details. When purchasing, please always quote the exact order number of the optional accessory.
en Operating the appliance Make sure that the cooking compartment does not contain any leftover packaging, such as polystyrene pellets. Before heating the appliance, wipe the smooth surfaces in the cooking compartment with a soft, wet cloth. Keep the kitchen ventilated while the appliance is heating. Apply the settings indicated. Settings Type of heating Top/bottom heating % Temperature Cooking time 240 °C 1 hour You can find out how to set the type of heating and the temperature in the next section.
Time-setting options en 2. Press the arrow ¿ to switch to the temperature. 3. Use the rotary selector to change the temperature. 7RS ERWWRP KHDWLQJ & ■ You can use the l button to check the current cooking compartment temperature during rapid heat up. Cancelling Press the c button. The c symbol disappears from the display. 4. Press the Start/Stop button. PLQ V 7RS & ERWWRP KHDWLQJ The set type of heating and the temperature are displayed in the display.
Time-setting options en Cancelling the timer duration End time Press the 0 button to open the time-setting options menu and turn the time back. Press the 0button to close the menu. If you change the end time to a later time, please remember that easily spoiled foods must not be allowed to remain in the cooking compartment for too long. Prerequisite: The selected operation has not already begun. A cooking time has been set. The time-setting options menu 0 is open.
Childproof lock AChildproof lock Your appliance is equipped with a childproof lock so that children cannot switch it on accidentally or change any settings. kco l f o rpd l i hC Activating and deactivating You can activate and deactivate the childproof lock when the appliance is switched on or off. In each case, press the / button for approx. 4 seconds. A confirmation note appears in the display and the / symbol appears in the status bar.
en Sabbath mode Power cut Following a long power cut, the settings for initial use are shown in the display. Reset the language, time and date. FSabbath mode With the Sabbath mode, a cooking time of up to 74 hours can be set. You can keep the food in the cooking compartment warm without having to switch the oven on or off. edom h t ab aS Starting Sabbath mode Prerequisite: "Sabbath mode activated" is activated in the basic settings.
Cleaning agent en : Warning Risk of fire! Loose food residues, grease and meat juices may catch fire during the cleaning function. Before starting the cleaning function, remove coarse dirt from the cooking compartment and from the accessories. ■ The appliance will become very hot on the outside during the cleaning function. Never hang combustible objects, e.g. tea towels, on the door handle. Do not place anything against the front of the appliance. Keep children away from the appliance.
en Area Cleaning agent Cleaning Appliance exterior Stainless steel Hot soapy water: front Clean with a dish cloth and then dry with a soft cloth. Remove flecks of limescale, grease, starch and albumin (e.g. egg white) immediately. Corrosion can form under such flecks. Special stainless steel cleaning products suitable for hot surfaces are available from our after-sales service or from specialist retailers. Apply a very thin layer of the cleaning product with a soft cloth.
Rails en qAppliance door pRails With good care and cleaning, your appliance will retain its appearance and remain fully functional for a long time to come. This will tell you how to remove the shelves and clean them. s l i aR With good care and cleaning, your appliance will retain its appearance and remain fully functional for a long time to come. This will tell you how to remove the appliance door and clean it.
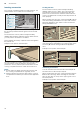
Appliance door en Fitting the appliance door Reattach the appliance door in the opposite sequence to removal. 1. When attaching the appliance door, ensure that both hinges are inserted straight into the opening (figure !). Place both hinges at the bottom on the outer panel and use this as a guide. Ensure that the hinges are inserted into the correct opening. You must be able to insert them easily and without resistance.
Appliance door en 6. Push both retainers on the intermediate panel upwards, but do not remove it (figure %). Hold the 5. Press the front panel at the bottom until it clicks audibly into place (figure %). 6. Open the appliance door again slightly and remove 7. Screw both screws back in on the left and right. 8. Put the cover back in place and press on it until it clicks audibly into place (figure &). panel with one hand. Remove the panel. the tea towel.
en Trouble shooting 3 Trouble shooting If a fault occurs, there is often a simple explanation. Before calling the after-sales service, please refer to the fault table and attempt to correct the fault yourself. gn i t o h s e l buo r T Note: If a dish does not turn out as well as you had hoped, refer to the table section at the end of the instruction manual, where you will find plenty of tips and information. : Warning Risk of electric shock! Incorrect repairs are dangerous.
Customer service en 5. Remove the tea towel and switch on the circuit breaker. Glass cover If the glass cover of the halogen bulb is damaged, it must be replaced. You can obtain a new glass cover from the after-sales service. Please specify the E number and FD number of your appliance. 4Customer service Our after-sales service is there for you if your appliance needs to be repaired.
en Dishes PDishes You can use the "Dishes" operating mode to prepare a wide variety of food. The appliance selects most settings for you. s eh s i D Information about the programs ■ ■ ■ ■ ■ The cooking result depends on the quality of the food and the type of cookware. For an optimal cooking result, use food that is in good condition and chilled meat only. The appliance chooses the optimal heating mode and the time and temperature setting for you. You will only be asked to enter the weight.
6
6
Siemens-Electrogeräte GmbH Carl-Wery-Straße 34, 81739 München siemens-home.