
Home Theater Server User Manual

Chapter 10 - Create/Edit
Event Enrollment
95
Siemens Industry, Inc.
125-3584T
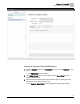
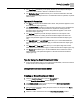
The Time Delay field allows you to specify the time (in seconds) that the object
must be in or out of alarm or fault for a notification to be sent.
The Notification Class dropdown allows you to choose the notification class that
the Event Enrollment Object will use. If no Notification Class is specified, no panels
will be notified.
Type-specific Parameters:
The States list displays the available alarm values. This parameter applies to COS
Event Enrollment Object types only.
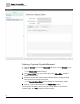
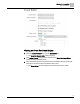
The Feedback Point dropdown provides the object reference for the feedback from
the object to be monitored. This parameter is required for creating an Event
Enrollment Object and cannot be edited. This parameter applies to FAL Event
Enrollment Object types only.
The Set Point dropdown provides the object reference for the setpoint. This
parameter is required for creating an Event Enrollment Object and cannot be
edited. This parameter applies to LIM and OOR Event Enrollment Object types
only.
The High Diff Limit and Low Diff Limit fields allow you to set the differential limit
from the setpoint. These parameters apply to LIM Event Enrollment Object types
only.
The High Limit and Low Limit fields allow you to set object’s high and low limit
alarm values. These parameters apply to OOR Event Enrollment Object types only.
The Deadband field allows you to set the deadband value to determine normal
alarm parameters. This parameter applies to LIM and OOR Event Enrollment
Object types only.
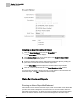
Tips for Using the Event Enrollment Editor
If the Event Enrollment object is not configured as alarmable, it will not be counted
in fault counts even if the object is in fault status.
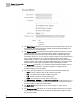
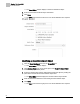
Using the Event Enrollment Editor
Creating an Event Enrollment Object
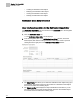
1. Click the Event Enrollment icon from the Create/Edit bar.
The Event EnrollmentEditor window displays.
2. Click Select a Panel at the top of the left pane of the Event EnrollmentEditor
window to display available panels.
3. Select the desired panel by clicking the panel name in the left pane of the Event
EnrollmentEditor window.
4. Click the + button at the bottom left of the Event EnrollmentEditor window.