
Home Theater Server User Manual

Chapter 10 - Create/Edit
Notification Class
103
Siemens Industry, Inc.
125-3584T
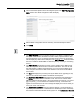
- In the Transitions cell, choose the desired transition options.
7. To add a remote recipient, click the + button at the bottom left of the Remote
Destinations table.
- In the Remote Recipient cell, choose the recipient via the drop down choices,
which displays all of the email addresses from the Remote Recipient List
Editor. Remote Recipients will display the index number, the alias, and then the
remote address.
NOTE: Entries that have been deleted or partially deleted from the Remote
Recipient List, but are still referred to from a Notification Class object, will
display with “(Empty)” in the deleted field.
- In the Valid Days cell, choose the valid days by checking the desired
checkboxes.
- In the From Time-To Time cell, enter the desired times.
- In the Transitions cell, choose the desired transition options.
8. Click Save.
The Save button becomes grayed out once the modifications are complete.
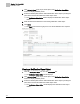
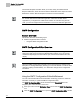
Modifying a Notification Class Object
1. Click the Notification Class icon from the Create/Edit bar.
The Notification ClassEditor window displays.