
User Guide


Powertop Two-Way Flared Valves Normally Open/Normally Closed Technical Instructions
155-310P25
May 16, 2005
Siemens Industry, Inc. Page 7
Service
Diaphragm replacement
Instructions for replacement are included in the kit.
Stem packing
Instructions for repacking the valve stem are included in the kit.
Valve disc replacement
Instructions for replacing the valve disc are included in the kit.
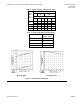
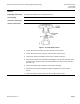
Actuator replacement
Figure 2. Actuator Replacement.
1. Loosen the two lower housing screws that clamp it to the bonnet.
2. Loosen the stem lock nuts using two 7/16-inch open-end wrenches.
3. Unscrew the actuator assembly from the stem as shown in Figure 2.
4. Push the stem all the way down before installing the new actuator assembly. There
must be at least 1/16-inch (2 mm) clearance between the lower stem lock nut and
the valve cap.
5. Pull the stem back up and install the new actuator assembly.
6. Screw the stem into the actuator piston plate and tighten the lock nuts with a
wrench.
7. Tighten the lower housing screws. Do not over tighte these screws.