
User Guide


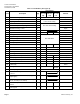
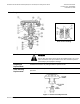


Table Of Contents

Technical Instructions
Document No. 155-092P25
November 20, 2008
Page 8 Siemens Industry, Inc.
Actuator
Assembly
Replacement
1. Loosen the two lower housing screws that clamp it to the bonnet.
2. Using two open-end wrenches, loosen the stem locknuts.
3. Unscrew actuator assembly from stem and remove it, as shown in Figure 6.
4. Before installing new actuator assembly, push stem down. There must be at least
1/16-inch (2 mm) clearance between lower stem locknut and cap.
5. Pull stem up and install actuator assembly.
6. Screw stem into piston plate and tighten locknuts.
7. Tighten lower housing screws. Don't overtighten these screws.
The replacement is now complete.
Valve Disc
Replacement
Disassembly
1. Remove actuator as described in the Actuator Assembly Replacement section.
2. Remove stem locknuts.
3. Remove lower body and pull stem assembly through bottom port.
4. Place stem assembly in a vise. Hold assembly by upper disc assembly, NOT BY THE
STEM. The stem must be smooth to provide a good seal and move freely. Place 1/2-inch
(13 mm) open-end wrench on lower disc assembly and compress disc spring so "C" ring
can be pulled out with long nose pliers. Be careful; disc spring has a lot of force.
5. Disassemble as shown in Figure 7. Upper and lower disc assemblies can now be
removed and replaced.
6. If small O-rings need to be replaced, use a small screwdriver to free them from groove.
7. Remove the cap from the bonnet. Then remove the washer, O-ring packing, and packing
ring as shown in Figure 7.
Assembly
1. Reassemble stem assembly. See step 4 in the Disassembly section and Figure 7. Be
careful, it requires considerable force to compress disc spring so "C" ring can be
replaced on valve stem. Slide stem assembly into bonnet.
2. Return lower body to bottom of valve body and tighten securely.
3. Replace packing ring, O-rings packing and washer using repacking kit 658-167. Follow
recommended procedure outlined in TB246 included in 658-167 kit. Packing must be
replaced because it is normally damaged during disassembly.
4. When packing has been replaced and valve body is reassembled, replace actuator
assembly by reversing steps 1 through 3 in the Actuator Assembly Replacement section.
The replacement is now complete.