
Installation Instructions

Document No. 129-365
Installation Instructions
October 1, 2009
Information in this publication is based on current specifications. The company reserves the right to make changes in specifications and models as
design improvements are introduced. Flowrite is a registered trademark of Siemens Industry, Inc. Product or company names mentioned herein may be
the trademarks of their respective owners. © 2009 Siemens Industry, Inc.
Siemens Industry, Inc.
Building Technologies Division
1000 Deerfield Parkway
Buffalo Grove, IL 60089
+ 1 847-215-1000
Your feedback is important to us. If you have
comments about this document, please send them to
sbt_technical.editor.us.sbt@siemens.com
Document No. 129-365
Printed in the USA
Page 2 of 2
Installation
1. Loosely screw the jam nut and stem adapter on
valve stem.
Assemble Kit to Valve
2. Screw/slip the bonnet adapter insert as far as
possible on to the valve. The packing gland may
need to be removed.
NOTE: For ARK11, (Siemens 591and 598 series)
and ARK12 (Johnson VG2XXX) measure
the bonnet to determine which insert to
use. Discard any remaining inserts.
3. Reinstall packing gland if previously removed. Slip
bonnet adapter over bonnet adapter. Insert and
align set screw openings.
4. With valve stem in down position:
a. For ARK 11 (Siemens 591-XXXX and
598-XXXX), ARK 12 (Johnson) and ARK14
(Siebe) measure stem adapter and use the stem
adapter that properly aligns with top edge of
bonnet adapter. Discard any remaining stem
adapters.
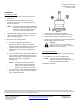
b. For “Up to Open” valves: Adjust stem adapter so
that the edge is approximately 1/8-inch (5 mm)
above bonnet adapter, while still maintaining at
least two full threads of engagement.
See Figure 1.
NOTE: For ARK 16 (Honeywell V3XXXX
2-inch through 3-inch): Adjust stem
adapter so a minimum of two full
threads of engagement is achieved.
c. For “Up to Close” valves: Adjust stem adapter so
that edge is at least 1/8-inch (5 mm) below the
top of the Bonnet Adapter.
Figure 1.
5. Tighten jam nut to base of Stem Adapter.
(Temporarily remove Bonnet Adapter if needed.)
6. Replace Bonnet Adapter if previously removed.
7. Tighten set screws through the Bonnet Adapter and
Bonnet Adapter Insert to the valve.
CAUTION:
If the set screws are not properly aligned,
damage may occur to the valve, the actuator or
both when actuator is engaged.
1. Pull valve stem, with adapter, to its full up position.
Assemble Actuator to Kit
2. Assemble Actuator to the retrofitted valve.
NOTE: Actuator may need to be manually
adjusted to reach stem adapter. See the
actuator installation instructions.
Installation is complete.