
Install Instructions


Document No. 129-216
Installation Instructions
September 29, 2009
Page 4 of 6 Siemens Industry, Inc.
Installation, Continued
Three-way valves
Removing the Packing and the Stem and Plug
Assembly. (See Figure 4)
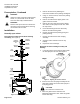
Figure 4. Three-Way Valve.
1. Remove the actuator by following the
instructions included in the packing cartridge kit.
2. Using a 1-1/2 inch wrench, remove the packing
cartridge assembly.
3. Remove and discard the copper gasket. The
gasket cannot be reused.
4. Remove the cap screws on the service flange, if
used. See Table 1 for the proper wrench size.
Save the cap screws.
5. Remove and discard the gasket.
6. Select the lower seat tool with the matching
valve body size stamped on it.
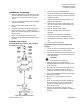
7. Using a socket wrench inserted into the lower
seat tool (Figure 5), carefully remove the lower
seat from the valve body.
Figure 5. Lower Seat Tool and Socket Wrench with
Extender.
8. Remove and discard the stem and plug
assembly.
9. Remove the packing spring and packing bearing
from the bonnet and discard them.
10. Clean the bonnet threads to remove any build-
up. Also clean the threads of the lower seat and
valve body.
11. Inspect the seat for damage.
Replacing the Stem and Plug Assembly and
Packing
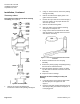
1. Locate the groove on the plug and align it with
the anti-spin pin in the upper seat. See
Figure 2.
2. Insert the new stem and plug assembly into the
valve body making sure that the anti-spin pin is
in the plug groove.