
Install Instructions

Document No. 129-318
Installation Instructions
September 30, 2009
Information in this publication is based on current specifications. The company reserves the right to make changes in specifications and
models as design improvements are introduced.
Product or company names mentioned herein may be the trademarks of their respective
owners. © 2009 Siemens Industry, Inc.
Siemens Industry, Inc.
Building Technologies Division
1000 Deerfield Parkway
Buffalo Grove, IL 60089
+ 1 847-215-1000
Your feedback is important to us. If you have
comments about this document, please send them
to sbt_technical.editor.us.sbt@siemens.com
Document No. 129-318
Printed in the U.S.A.
Page 2 of 2
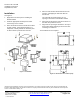
Installation
See Figure 2.
1. Apply label to actuator prior to installing the
Weather Shield.
2. Install the appropriate weatherproof conduit
connector(s) on the actuator.
3. Select the knockout that is intended for the SKD
or SQX actuator. Using diagonal cutters or a
utility knife, carefully remove the knockout piece
to allow conduit to protrude from actuator.
4. Place the two Weather Shield sides around the
actuator, overlapping the male side with the
female side.
The valve will extend through the pre-cut
opening in the bottom of the Weather Shield.
5. Align holes in side flanges and secure with six of
the cable ties provided in the kit.
6. Align holes in cap flanges with holes in the top of
the Weather Shield side flanges and secure with
remaining four cable ties.
The installation is now complete.
Figure 2. Installation.
Figure 3. Dimensions are in Inches (mm).