
Install Instructions


Document No. 129-215
Installation Instructions
September 29, 2009
Siemens Industry, Inc. Page 5 of 9
Installation, Continued
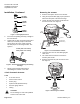
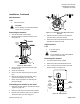
Figure 11. 12-inch Actuator Spring Adjustment.
3. Hold the adjustment screw with a 1-1/16 inch
wrench and loosen the stem nut with a 24 mm
wrench. See Figure 12.
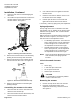
AP0201R1
1-1/16
inch
24 mm
Figure 12. 12-inch Pneumanic Actuator.
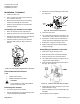
4. Lower the valve stem to avoid damaging the
valve stem.
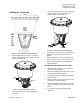
5. Use a 3/8-inch open-end wrench to loosen the
actuator retainer screws and remove the
actuator retainer. See Figure 13.
AP0174R1
1
2
3/8"
(9.5 mm)
Figure 13. Removing the Actuator Retainer.
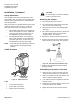
6. Remove the actuator from the valve bonnet by
pushing the actuator away from the valve
bonnet.
7. Remove and retain the stem retainer clip and
stem nut from the valve stem. See Figure 10.
8. Return to the instructions for Removing the
packing cartridge.
Assembling the actuator to the valve
1. Place the stem nut over the valve stem and
attach the stem retainer clip.
2. Place the actuator onto the valve bonnet, and
fasten it with the actuator retainer.
3. Use a 3/8-inch wrench to tighten the actuator
retainer screws.
4. Raise the valve stem so that the stem nut can
be fastened to the stem adapter.
5. Hold the adjustment screw with a 1-1/16 inch
wrench and tighten the stem nut with a 24 mm
wrench.
6. If necessary, make any spring start point
adjustment.