
Install Instructions


Document No. 129-215
Installation Instructions
September 29, 2009
Page 2 of 9 Siemens Industry, Inc.
Installation, Continued
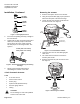
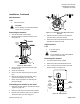
VF0133R2
PACKING
CARTRIDGE
COPPER
GASKET
STEM
BONNET
ASSEMBLY
Figure 1. Packing Replacement.
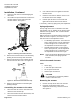
2. Insert the new packing assembly cartridge in
the valve bonnet.
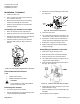
3. Tighten with an open-end wrench using 35 to
40 lb-ft (47 to 54 Nm) torque on the1/2 to
2-inch valves and 110 to 140 lb-ft (150 to
190 Nm) torque on the flanged valves. See
Figure 2.
VF0134R2
1-1/2"
(
2-1/2" to 6" valves
)
1-1/16"
(
1/2" to 2" valves
)
Figure 2. Removing and Replacing the Packing
Cartridge.
4. Return to the actuator instructions for
assembling the actuator to the valve.
4-inch Pneumatic Actuator
Tools
5 mm hex wrench
5/16-inch hex wrench
Air line plug
Squeeze bulb (baumanometer)
Pressure gauge and tee
Tubing
CAUTION:
Do not damage or scratch the polished
surface of the valve stem.
Removing the actuator
1. Remove and cap the air line to the actuator.
2. Using the squeeze bulb, apply 2 psi of pressure
above the start point of the actuator range.
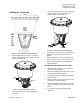
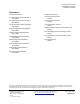
3. Loosen the two stem retainer screws with the
5 mm hex wrench. See Figure 3.
AP0228R1
5 mm hex
5/16 inch hex
STEM
RETAINER
ACTUATOR YOKE
SCREW AND NUT (2)
Figure 3. 4-inch Pneumatic Actuator.
4. Lower the valve stem to avoid damaging the
valve stem.
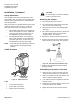
5. Use a 5/16-inch hex wrench to loosen the
actuator yoke screws.
6. Remove and retain the yoke screws and nuts.
See Figure 4.
AP0209R1
Figure 4. Removing the Actuator.