
Install Instructions


Document No. 129-233
Installation Instructions
September 29, 2009
Information in this publication is based on current specifications. The company reserves the right to make changes in specifications and
models as design improvements are introduced. Flowrite is a registered trademark of Siemens Industry, Inc.. Product or company names
mentioned herein may be the trademarks of their respective owners. © 2009 Siemens Industry, Inc.
Siemens Industry, Inc.
Building Technologies Division
1000 Deerfield Parkway
Buffalo Grove, IL 60089
+ 1 847-215-1000
Your feedback is important to us. If you have
comments about this document, please send
them to technical.editor@siemens.com
Document No. 129-233
Printed in the USA
Page 5 of 5
Installation, Continued
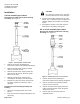
3. Insert the new stem and plug assembly into the
valve body.
CAUTION:
Be careful not to nick the seat or scratch
the valve stem. The valve must be
replaced if the seat is damaged.
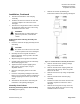
4. Place the lower port on the valve, and use an
adjustable wrench to tighten the lower port
applying 45 to 55 lb-ft (61 to 75 Nm) torque.
5. Place the new copper gasket on the valve
bonnet.
6. Insert the new packing cartridge into the valve.
Use a 1-1/16 inch wrench to tighten the cartridge
applying 35 to 40 lb-ft (47 to 54 Nm) torque.
7. Using the instructions in the packing cartridge
kit, assemble the actuator to the valve.
The installation is now complete.