
Install Instructions

Document No. 129-233
Installation Instructions
September 29, 2009
Page 4 of 5 Siemens Industry, Inc.
Installation, Continued
WARNING:
Cap threads are sharp! Either wear
gloves for protection, or handle with
caution.
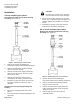
Replacing the Stem and Plug Assembly and
Packing.
1. Manually coat the O-ring with the silicone
lubricant provided. You may need to use both
tubes of lubricant.
2. Slip the O-ring into the groove of the cap.
3. Insert the new stem and plug assembly into the
valve body.
CAUTION:
Be careful not to nick the seat. The valve
must be replaced if the seat is damaged.
4. Place the cap on the valve, and use an
adjustable wrench to tighten the cap applying 45
to 55 lb-ft (61 to 75 Nm) torque.
5. Place the new copper gasket on the valve
bonnet.
6. Insert the new packing cartridge into the valve.
Use a 1-1/16 inch wrench to tighten the cartridge
applying 35 to 40 lb-ft (47 to 54 Nm) torque.
7. Assemble the actuator to the valve using the
instructions in the packing cartridge kit.
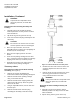
Three-way valves
Removing the Packing and the Stem and Plug
Assembly. (See Figure 4.)
1. Remove the actuator by following the
instructions included in the packing cartridge kit.
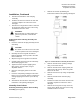
2. Remove and discard the packing cartridge
using a 1-1/16 inch wrench.
3. Remove and discard the copper gasket (the
gasket cannot be reused). Clean the gasket
surface of the valve.
4. Using an adjustable wrench, remove and save
the lower port.
5. Remove and discard the stem and plug
assembly (the assembly cannot be reused).
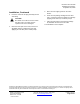
Figure 4. Flowrite 599 Series Three-Way Valve.
6. Examine the valve seat surface for nicks and
scratches. Replace the valve if the seat is
damaged.
7. Remove the O-ring from the lower port. Clean
the O-ring groove. Make sure none of the
O-ring material remains in the valve.
WARNING:
Lower port threads are sharp! Either wear
gloves for protection, or handle with
caution.
Replacing the Stem and Plug Assembly and
Packing.
1. Manually coat the O-ring with the silicone
lubricant provided. You may need to use both
tubes of lubricant.
2. Slip the O-ring into the groove of the cap.