
Install Instructions
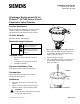

Document No. 129-214
Installation Instructions
September 28, 2009
Page 2 of 3 Siemens Industry, Inc.
Installation, Continued
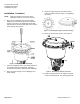
NOTE: Notice the position of the notches of the
diaphragm and boss on the lower housing.
6. Place the new diaphragm over the piston plate,
aligning one of the notches with boss in the lower
housing. The holes in the diaphragm should align
with the holes in the piston plate and outer rim of the
lower housing. See Figure 3.
Figure 3. Attaching the New Diaphragm.
7. Fasten the diaphragm to the piston plate with the six
new washers and screws provided. Tighten the
screws until the washer compresses the diaphragm.
8. Place the upper housing over the diaphragm and
lower housing.
9. Attach the upper housing to the lower housing.
Follow the pattern shown in Figure 4 for tightening
the screws.
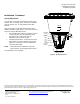
Figure 4. Assembling the Upper and Lower Housing.
10. Attach the air line to the actuator. See Figure 5.
AP0185R1
9/16"
1-1/16"
10
9
11
Figure 5. Returning the Actuator to Service.
11. Adjust the spring tension to the original start point
noted in the prerequisites. See Spring adjustment.