
Install Instructions

Installation Instructions
Document No. 129-214
September 28, 2009
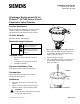
Diaphragm Replacement Kit for
Flowrite™ AP 599 Series 12-inch
Pneumatic Valve Actuator
Item Number 129-214, Rev. 300 Page 1 of 3
Product Description
This kit contains one diaphragm, six screws, and six
washers to replace the diaphragm in a Flowrite
AP 599 Series 12-inch Pneumatic Valve Actuator.
Product Number
599-01070 Normal duty diaphragm
Warning/Caution Notations
WARNING
Personal injury/loss of life may
occur if a procedure is not
performed as specified.
CAUTION
Equipment damage, or loss of
data may occur if the user
does not follow procedure as
specified.
Required Tools
9/16-inch (15 mm) socket or open end
wrench
1-1/16 inch (27 mm) open end wrench
#2 Phillips screwdriver
Expected Installation Time
60 minutes to replace an actuator diaphragm
Prerequisites
Make a note of the start point pressure before
relieving the spring tension.
Installation
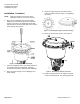
1. Disconnect the air line to the actuator. See
Figure 1.
2. Using a 1-1/16 inch open end wrench on the
adjustment screw, relieve all spring tension.
WARNING:
Relieve all spring tension before removing
the actuator upper housing.
AP0186R1
3
1
1-1/16"
9/16"
2
Figure 1. Removing the Actuator Upper Housing.
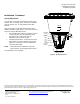
3. Use a 9/16-inch socket wrench to remove the
screws holding the upper and lower housing
together. Keep the screws.
4. Remove the upper housing.
5. Use a #2 Phillips screwdriver to remove the six
screws holding the diaphragm to the piston
plate. See Figure 2.
Figure 2. Removing the Diaphragm.