
User Guide


Technical Instructions RL 147 Positioning Relay
Document Number 155-038P25
April 1, 2005
Page 6 Siemens Industry, Inc.
Calibration,
Continued
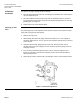
For spans of 11 psig or 12 psig (76 kPa or 83 kPa):
1. Move the span adjustment tab to the 10 setting on the feedback arm. Follow Steps 2
and 3 in Setting the span.
2. Move the feedback spring one hole away from the standard location for a span of
11 psig (76 kPa) and two holes away from the standard spring location for a 12 psig
(83 kPa) span. See Figure 4.
3. Follow Steps 4 and 5 in Setting the Span.
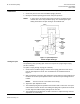
Adjusting the Start
Point
See Figure 5.
The positioning relay can be adjusted to start actuator movement at pressures between
3 psig and 10 psig (21 kPa and 69 kPa).
1. Remove the relay cover.
2. Attach tubing with a pressure gauge and squeeze bulb to the "T" Port. Supply air
should be attached to the "S" Port. The "M" Port should be attached to the connector
on the actuator.
3. Using the squeeze bulb, apply pressure to the relay. Watch the valve stem or
actuator shaft to see when it begins to move. Check the pressure gauge; this is the
start point pressure.
4. If this is not the desired start point pressure, turn the start point adjustment nut
(Figure 5) clockwise to increase the start point pressure and counterclockwise to
decrease the pressure.
5. Repeat Steps 3 and 4 until the stem or shaft begins to move at the desired pressure.
Figure 5. Start Point Adjustment.