
Data Sheet for Product
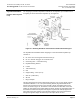

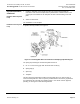
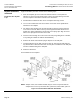
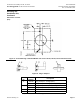
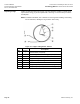
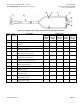
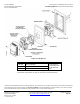
Table Of Contents

Accessories for Installing TH 192, TH 194 or Technical Bulletin
Free Energy Band TH 193 HC Room Thermostats Document Number 155-244P25
Rev. 2, December, 2001
Siemens Industry, Inc. Page 13
Drywall Installation,
Continued
Rough-in before drywall
is up
7. Install the wall plate on the bracket (D) using the screws furnished with the
instrument. Note that the wall plate has key slotted holes to allow insertion of the
screws prior to installation of the wall plate and also to allow leveling of the wall
plate.
8. Attach the thermostat.
The installation is now complete
Installation after drywall
is up
If drywall is already installed, see Figure 12.
Figure 12. Mounting Wall Plate and Instrument with Spring Clip Mounting Kit.
The spring clip mounting kit for finished drywall consists of:
A. No. 6 × 1-1/4 inch long type "AB" flat-head steel screws (2)
B. Spring Clip (2)
C. Spacer (2)
D. Template
This kit is designed specifically for 5/8-inch thick drywall, but it can also be used on
1/2-inch thick drywall. The stick-on spacers provided with the kit fill in the gap between
the drywall and clip to provide more holding power. It can also be used on plywood,
paneling, or other types of wall sheathing material.