
User's Manual Addendum

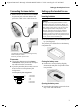
Table Of Contents
- Handset at a glance
- Safety precautions
- Gigaset S445 - More than just a telephone
- Setting up the telephone for use
- Operating the handset
- Notes on the user guide
- Making calls
- Using the directory and lists
- Directory and call-by-call list
- Storing a number in the call-by-call list
- Selecting entries in the directory and call-by-call list
- Dialling with the directory/ call-by-call list
- Managing entries in the directory/ call-by-call lists
- Sending the directory/call-by-call list to another handset
- Copying a number from the directory
- Storing anniversaries in the directory
- Voice dialling
- Saving a new email address
- Managing email addresses
- Manual last number redial
- Managing entries in the last number redial list
- Opening lists with the message key
- Directory and call-by-call list
- Making cost-effective calls
- SMS (text messages)
- Operating the answering machine
- Operation via the handset
- Switching answering machine on/off
- Recording a personal announcement/ announce only
- Playing back announcements
- Deleting announcements
- Select announcement mode
- Playing back messages
- Deleting messages
- Picking up a call from the answering machine
- Diverting an external call to the answering machine
- Activating/deactivating two-way recording
- Permanently activating/deactivating listen in
- Switching off listen in for the current recording
- Setting up the answering machine
- Operating when on the move (remote operation)
- Operation via the handset
- Using T-Net box
- Using several handsets
- Handset settings
- Base station settings
- Connecting the base station to the PABX
- Appendix
- Menu tree
- Accessories
- Index

8
Setting up the telephone for use
Gigaset S440-445 / IM-engl / A31008-M1635-A661-1-7619 / starting.fm / 07.06.2005
Placing handset in base station
and registering
¤ Place the handset in the base station
with its display facing forward.
The handset registers automatically. Reg-
istration takes around 1 minute. During
this process Regstr.Procedure appears in
the display and the name of the base sta-
tion flashes e.g. Base 1. The handset will
be assigned the lowest unassigned inter-
nal number (1–6).
This will appear in the display when regis-
tration is complete, e.g. INT 1. This means
that the number 1 has been assigned. If
the internal numbers 1–6 are already
assigned to other units, the number 6 is
overwritten.
To charge the batteries, leave the handset
in the charging cradle.
For questions and problems see page 58.
Initial charging and discharging of
batteries
If the handset is activated, the battery
charging process is indicated on the hand-
set by the flashing battery icon e.
During handset operation, the battery
icon indicates the charge status of the bat-
teries (page 1). The correct charge status
can only be displayed if the batteries are
first fully charged and discharged.
¤ To do this, leave the handset in the
charging cradle uninterrupted for 10
hours. Your handset need not be
switched on for it to charge.
¤ Once the batteries are fully charged,
remove the handset from the cradle
and do not put it back again until the
batteries are fully discharged.
Please note:
u Always repeat the charging and dis-
charging procedure if you remove the
batteries from the handset and insert
them in again.
u The batteries may warm up as they are
charging. This is not dangerous.
u After a time the charge capacity of the
batteries will decrease for technical rea-
sons.
Your phone is now ready for use.
Your answering machine is set with a
standard announcement.
¤ Set the date and the time(page 9), for
example to ensure the correct time of
incoming calls is recorded.
Attaching the belt clip
There are notches on the side of the hand-
set side at approximately the same height
as the display for attaching the belt clip.
¤ Press the belt clip onto the back of the
handset so that the protrusions on the
belt clip click into the notches.
The belt clip's clasp must be pointing
towards the battery compartment.
Notes:
– Automatic registration is only possible
while no-one is making calls using the base
station.
– Each key press interrupts the automatic
registration.
– If automatic registration does not work,
you will have to register the handset manu-
ally.
– You can change the name of the handset
(page 43).
Notes:
– When the handset is in the base station, it
charges even if it is switched off.
– If the handset has switched itself off
because the batteries are flat and is then
placed in the cradle, it will switch itself on
automatically.
– The handset must only be placed in the
designated base station.
Note:
After the initial charge and discharge you may
replace your handset in the charging cradle
after every call.