
User's Manual Addendum
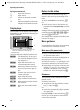

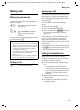
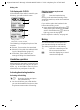


Table Of Contents
- Handset at a glance
- Safety precautions
- Gigaset S445 - More than just a telephone
- Setting up the telephone for use
- Operating the handset
- Notes on the user guide
- Making calls
- Using the directory and lists
- Directory and call-by-call list
- Storing a number in the call-by-call list
- Selecting entries in the directory and call-by-call list
- Dialling with the directory/ call-by-call list
- Managing entries in the directory/ call-by-call lists
- Sending the directory/call-by-call list to another handset
- Copying a number from the directory
- Storing anniversaries in the directory
- Voice dialling
- Saving a new email address
- Managing email addresses
- Manual last number redial
- Managing entries in the last number redial list
- Opening lists with the message key
- Directory and call-by-call list
- Making cost-effective calls
- SMS (text messages)
- Operating the answering machine
- Operation via the handset
- Switching answering machine on/off
- Recording a personal announcement/ announce only
- Playing back announcements
- Deleting announcements
- Select announcement mode
- Playing back messages
- Deleting messages
- Picking up a call from the answering machine
- Diverting an external call to the answering machine
- Activating/deactivating two-way recording
- Permanently activating/deactivating listen in
- Switching off listen in for the current recording
- Setting up the answering machine
- Operating when on the move (remote operation)
- Operation via the handset
- Using T-Net box
- Using several handsets
- Handset settings
- Base station settings
- Connecting the base station to the PABX
- Appendix
- Menu tree
- Accessories
- Index

11
Notes on the user guide
Gigaset S440-445 / IM-engl / A31008-M1635-A661-1-7619 / starting.fm / 07.06.2005
Correcting incorrect entries
You can correct incorrect characters in the
text by navigating to the incorrect entry
using the control key. You can then:
u press X to delete the character to the
left of the cursor,
u insert characters to the left of the cur-
sor,
u overwrite the character (flashing)
when entering the time and date, etc.
Notes on the user guide
This section explains the meaning of cer-
tain symbols and typographical conven-
tions that are used in this user guide.
Symbols
Copy Entry / Copy List (example)
Select one of the two menu
functions specified.
~ Enter digits or letters.
§Save§ The display keys' current func-
tions are shown reverse high-
lighted in the bottom display
line. Press the display key
below to launch the function.
q Press the top or the bottom of
the control key: scroll up or
down.
r Press the right or left of the
control key: e.g. select setting.
c / Q / * etc.
Press the matching key on the
handset.
Example: menu input
In this user guide, sequences of symbols
are used to show you which steps you
must carry out. This system is explained
below using the example of "setting the
display's colour scheme". The things you
have to do are explained in the boxes.
v
¢ Ð ¢ Display
¤ With the handset in idle status, press
on the right of the control key to open
the main menu.
¤ Select the icon Ð using the control
key – press the control key right, left,
up or down.
In the display header, H/Set Settings is dis-
played.
¤ Press §OK§ on the display key to confirm
the function H/Set Settings.
You will see the submenu H/Set Settings.
¤ Press the bottom of the control key
repeatedly until Display is selected.
¤ Press §OK§ on the display key to confirm
the function.
Colour Scheme
Select and press
§OK§.
¤ Press the bottom of the control key
repeatedly until Colour Scheme is
selected.
¤ Press §OK§ on the display key to confirm
the function.
s Select a colour scheme and
press
§OK§ (‰ = current colour).
¤ Press the top or bottom of the control
key to select a colour scheme.
¤ Press §OK§ on the display key to confirm
the function.
The selected colour scheme is
marked with ‰.