
User's Guide


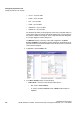


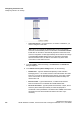
Table Of Contents
- 1 About this Guide
- Contents
- 2 Overview of the HiPath Wireless Controller, Access Points and Convergence Software solution
- 2.1 Conventional wireless LANs
- 2.2 Elements of the HiPath Wireless Controller, Access Points and Convergence Software solution
- 2.3 HiPath Wireless Controller, Access Points and Convergence Software and your network
- 2.4 HiPath Wireless Controller product family
- 3 Configuring the HiPath Wireless Controller
- 3.1 System configuration overview
- 3.2 Logging on to the HiPath Wireless Controller
- 3.3 Working with the basic installation wizard
- 3.4 Configuring the HiPath Wireless Controller for the first time
- 3.4.1 Changing the administrator password
- 3.4.2 Applying product license keys
- 3.4.3 Setting up the data ports
- 3.4.4 Setting up Internal VLAN ID and multi-cast support
- 3.4.5 Setting up static routes
- 3.4.6 Setting up OSPF Routing
- 3.4.7 Configuring filtering at the interface level
- 3.4.8 Installing certificates on the HiPath Wireless Controller
- 3.4.9 Configuring the login authentication mode
- 3.4.10 Configuring network time
- 3.4.11 Configuring DNS servers for resolving host names of RADIUS servers
- 3.5 Additional ongoing operations of the system
- 4 Configuring the Wireless AP
- 4.1 Wireless AP overview
- 4.2 Discovery and registration overview
- 4.2.1 Wireless AP discovery
- 4.2.2 Registration after discovery
- 4.2.3 Understanding the Wireless AP LED status
- 4.2.4 Configuring the Wireless APs for the first time
- 4.2.5 Defining properties for the discovery process
- 4.2.6 Connecting the Wireless AP to a power source and initiating the discovery and registration process
- 4.3 Adding and registering a Wireless AP manually
- 4.4 Configuring Wireless AP settings
- 4.4.1 Modifying a Wireless AP’s status
- 4.4.2 Configuring a Wireless AP’s properties
- 4.4.3 AP properties tab configuration
- 4.4.4 Assigning Wireless AP radios to a VNS
- 4.4.5 Configuring Wireless AP radio properties
- 4.4.6 Setting up the Wireless AP using static configuration
- 4.4.7 Configuring Telnet/SSH Access
- 4.5 Configuring VLAN tags for Wireless APs
- 4.6 Modifying a Wireless AP’s properties based on a default AP configuration
- 4.7 Modifying the Wireless AP’s default setting using the Copy to Defaults feature
- 4.8 Configuring Wireless APs simultaneously
- 4.9 Configuring an AP as a sensor
- 4.10 Performing Wireless AP software maintenance
- 5 Virtual Network Services concepts
- 6 Configuring a VNS
- 6.1 High level VNS configuration flow
- 6.2 VNS global settings
- 6.2.1 Defining RADIUS servers and MAC address format
- 6.2.2 Configuring Dynamic Authorization Server support
- 6.2.3 Defining Wireless QoS Admission Control Thresholds
- 6.2.4 Defining Wireless QoS Flexible Client Access
- 6.2.5 Working with bandwidth control profiles
- 6.2.6 Configuring the Global Default Policy
- 6.2.7 Using the Sync Summary
- 6.3 Methods for configuring a VNS
- 6.4 Working with the VNS wizard to create a new VNS
- 6.5 Working with a GuestPortal VNS
- 6.6 Creating a VNS using the advanced method
- 6.7 Working with existing VNSs
- 6.8 Configuring a Topology
- 6.9 Configuring WLAN Services
- 6.9.1 Configuring a WLAN Service
- 6.9.2 Configuring privacy
- 6.9.3 Configuring accounting and authentication
- 6.9.3.1 Vendor Specific Attributes
- 6.9.3.2 Defining accounting methods for a WLAN Service
- 6.9.3.3 Configuring authentication for a WLAN Service
- 6.9.3.4 Defining the RADIUS server priority for RADIUS redundancy
- 6.9.3.5 Configuring assigned RADIUS servers
- 6.9.3.6 Defining a WLAN Service with no authentication
- 6.9.3.7 Configuring Captive Portal for internal or external authentication
- 6.9.4 Configuring the QoS policy
- 6.10 Configuring Policy
- 6.11 Working with a Wireless Distribution System
- 6.11.1 Simple WDS configuration
- 6.11.2 Wireless Repeater configuration
- 6.11.3 Wireless Bridge configuration
- 6.11.4 Examples of deployment
- 6.11.5 WDS WLAN Services
- 6.11.6 Key features of WDS
- 6.11.7 Deploying the WDS system
- 6.11.7.1 Connecting the WDS Wireless APs to the enterprise network for discovery and registration
- 6.11.7.2 Configuring the WDS Wireless APs through the HiPath Wireless Controller
- 6.11.7.3 Assigning the Satellite Wireless APs’ radios to the network WLAN Services
- 6.11.7.4 Connecting the WDS Wireless APs to the enterprise network for provisioning
- 6.11.7.5 Moving the WDS Wireless APs to the target location
- 6.11.8 Changing the pre-shared key in a WDS WLAN Service
- 7 Availability and session availability
- 8 Configuring Mobility
- 9 Working with third-party APs
- 10 Working with the Mitigator
- 11 Working with reports and displays
- 12 Performing system administration
- 13 Glossary
- A HiPath Wireless Controller’s physical description
- B Regulatory information
- C optiPoint WL2 Configuration
- D SpectraLink Wireless Telephones
- E Default GuestPortal source code
- 2 Overview of the HiPath Wireless Controller, Access Points and Convergence Software solution

hwc_apstartup.fm
Configuring the Wireless AP
Configuring Wireless AP settings
9034530-02,
March 2010
HiPath Wireless Controller, Access Points and Convergence Software V7.11, User Guide 137
•a/n – Click to enable the 802.11a mode of Radio 1 with 802.11n
capability.
Note: Depending on the radio modes you select, some of the radio
settings may not be available for configuration. The Wireless AP
hardware version dictates the available radio modes.
• Channel Width – Click the channel width for the radio:
•20MHz – Click to allow 802.11n clients to use the primary channel
(20MHz) and non-802.11n clients, as well as beacons and multicasts,
to use the 802.11b/g radio protocols.
•40MHz – Click to allow 802.11n clients that support the 40MHz
frequency to use 40MHz, 20MHz, or the 802.11b/g radio protocols.
802.11n clients that do not support the 40MHz frequency can use
20MHz or the 802.11b/g radio protocols and non-802.11n clients,
beacons, and multicasts use the 802.11b/g radio protocols.
•Auto – Click to automatically switch between 20MHz and 40MHz
channel widths, depending on how busy the extension channel is.
6. In the Basic Radio Settings section, do the following:
•RF Domain – Type a string that uniquely identifies a group of APs that
cooperate in managing RF channels and transmission power levels. The
maximum length of the string is 16 characters. The RF Domain is used to
identify a group of Wireless APs.
• Request New Channel – Click the wireless channel you want the
Wireless 802.11n AP to use to communicate with wireless devices.
Click Auto to request the ACS to search for a new channel for the
Wireless AP, using a channel selection algorithm. This forces the
Wireless AP to go through the auto-channel selection process again.
Note: ACS in the 2.4GHz radio band with 40MHz channels is not
recommended due to severe co-channel interference.
Depending on the regulatory domain (based on country), some channels
may be restricted. The default value is based on North America. For more
information, see Appendix B.