
Installation Instructions


LOUVERED SHUTTER INSTALLATION INSTRUCTIONS
US
ING METAL SHUTTER SCREWS (NOT INCLUDED)
TOOLS REQUIRED: Power Drill, Phillips Head Screwdriver, Tape Measure, Pencil or Marker, 3/16-in. Drill Bit,
1/8-in. Drill Bit.
FASTENERS REQUIRED: 2-1/2-in. Pan Head Screws (6 per shutter), #10 Screw Anchors (6 per shutter)
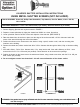
1. Remove Shipping Spacers and recycle as noted in FIGURE 1.
2. Prepare to locate spike holes by laying the shutter face DOWN on a clean, flat surface.
3. Locate cylindrical stand-off at each corner and midpoint of the side stile. (SEE FIGURE 2)
4. Raise the shutter from the surface or place over the edge of the surface and drill a 3/16-in. diameter hole in the
center of the stand-off through the back of the shutter.
5. Position the shutter on the house next to the window. Using a pencil, marker or nail, mark the mounting hole
locations on the building.
6. Remove the shutter and, where marked and drill a 3/16-in. diameter hole through the Wood, Vinyl or Aluminum siding
only.
7. If the wall is Wood - Drill a 1/8-in. diameter hole, 1 ½-in. deep into the wall. If the wall is Masonry or Brick - use a
screw anchor for 2-1 /2 -in. #1 O screw (not provided). Follow direction on the screw anchor package.
8. Position the shutter on the house next to the window and fasten, using a hand screw driver, with the 2½-in. #10 pan
head screws (not provided).
9. Do not overtighten screws into shutter/wall - this will cause deformation of the shutter surface.
Cylindrical
-----le
e;-L--
Cylindrical
Stand-Offs .------, Stand-Offs
Cylindrical __
9
<=--Cylindrical
Stand-Offs
1-------1
Stand-Offs
Cylindrical __
9
<=--Cylindrical
Stand-Offs
I I
Stand-Offs
FIGURE 1 FIGURE 2
CLEANING: Use garden hose to spray off debris and dirt. For more extensive cleaning, use a soft bristle brush
and mild detergent.
Questions: Contact PLASTIC DEVELOPMENT GROUP at 248-363-5552 or visit us at www.plasticdevelopmentgroup.com