
Service manual


Shure LX2 Hand-Held Transmitter
Service Procedures25
25D1006 (CG)
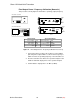
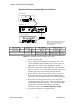
Audio Alignment: Domestic and Euro
AUDIO ANALYZER
–
+
J102
J101
R130
R125
U102
U101
S102
S101
AUDIO BOARD
(TOP)
TRANSMITTER SHOWN WITH
BATTERY CUP REMOVED, AND
AUDIO TEST HEAD ATTACHED.
C107
LX2 Transmitter Audio Analyzer
Power supply: 9 Vdc Frequency: 1 kHz
Power switch: PWR Amplitude: 230 mV
Mic switch: ON Filters:
Gain: Mid 400 Hz High-Pass: ON
30 kHz Low-Pass: ON
Figure 16. Audio Alignment Test Set-Up
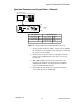
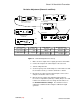
1. Put the mic (mute) switch in the ON position.
2. Turn the LX2 power OFF.
3. Replace C240 for domestic, C242 for Euro, on the rf pcb.
4. Use a soldering iron to remove the 50 Ω test cable.
5. Turn the LX2 power ON.
6. Insert the pcb assembly through the brass ring and
screw on the audio test head.
7. Set the audio analyzer output to a frequency of 1 kHz and an
amplitude of 230 mV.
8. Connect the output of the audio analyzer to the
audio test head.
9. Adjust R125 (gain) for 775 ± 0 mV (0.775 V) or 0 dBu ± .1 dBu
at the anode (+) side of C107 on the audio board.