
User's Manual


PGXD
BIAS
AUDIO
0dB
-10dB
AUDIO
0dB
-10dB
FP2
FP1
FP3
0
-10dB
mic
0
-10dB
mic
4
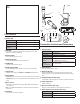
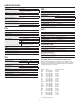
Adjusting Gain
FP1 and FP3
Performasoundcheck.Usethe
audiogaincontrollocatedonthe
side(FP1)orfront(FP3)ofthe
unittoadjustthegainup(+)or
down(−)untildesiredlevelis
reached.
FP3 only: Adjustsotheaudio
inputlevelindicatorflickersyellow
atpeaksoundlevels.
FP2
Thehandheldtransmitternormally
doesnotrequireadjustmentand
should be left at 0dBformostappli-
cations.Onlyusethe–10dBsettingfor
loudsingingorotherhighSPLapplica-
tionsifthereisnoticabledistortion.
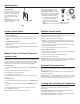
Accessthegainadjustmentswitch
byunscrewingtheheadofthe
microphone.Usethetipofapen
orasmallscrewdrivertomovethe
switch: 0dB: Fornormaluse.
–10dB: UseonlyifaudiodistortsduetohighSPLlevels.
Single System Setup
1.Perform a group scan:
Pressandholdthescanbuttonfor3seconds.Afterthescancom-
pletes,thenewgroupandchannelisautomaticallyactivatedand
saved.
2.Synchronize the transmitter:
Alignthetransmitterandreceiverinfrared(IR)portsandpressthe
syncbutton.
Afterasuccessfulsync,thetransmitterLEDmomentarilyflashesand
theblueRFLEDilluminates.
Multiple System Setup
Usethefollowingstepstoensurethebestperformancewhenusingmul-
tiplewirelesssystemsatthesamelocation.
1.Turnallreceiversonandalltransmittersoff.
Note: Turnonanyotherdigitalequipmentthatcouldcauseinterfer-
enceduringtheperformancesoitwillbedetectedduringthefrequen-
cyscansinthefollowingsteps.
2.Performagroupscanusingthefirstreceiverbypressingandholding
thescanbuttonfor3seconds.
3.Turnonthefirsttransmitterandsyncittothereceiver.
For each additional system:
1.
Manuallysetthegroupnumbertomatchthefirstreceiver(seeManual
GroupandChannelSelection).
2.Performachannelscanbypressingthescanbutton.
3.Syncthetransmittertothereceiver.
Important: Aftersyncingeachtransmitter,leaveitonsothatscansfrom
theotherreceiversdonotselectthatchannel.Besureonlyonetransmit-
terIRportisexposedwhensynchronizingeachsystem.
Manual Group and Channel Selection
(receiver only)
Important: Mostsingle-systemapplicationsdonotrequiremanualgroup
orchannelsettings--useanautomaticfrequencyscaninstead.However,
itmaybeusefulforsomeapplications,suchastotunetoandrecordau-
diodirectlyfromamicrophoneinacompatiblewirelessinstallation.
To set the group:
1.
Pressthescanandsyncbuttonssimultaneously.TheGROUPdisplay
flashes.
2.Pressthesyncbuttontochangethegroupnumber.
3.Pressscantoaccepttheselectedgroup.
4.Pressscanagaintosaveandexit.
5.Ifdesired,performachannelscantoselectanopenchannelinthat
group.
To set the channel:
1.
Pressthescanandsyncbuttonssimultaneously.TheGROUPdisplay
flashes.
2.Pressscantomovetothechannelsetting.TheCHANNELnumber
flashes.
3.Pressthesyncbuttontoadvancetothedesiredchannelnumber.
4.Pressscantosaveandexit.
Note: Remembertosyncthetransmittertothereceiver.
Automatic Frequency Scan
IfyouexperienceRFinterference,switchtoanewchannelusingthe
channelorgroupscan.
Channel scan: Pressthescanbuttononthereceiver.Switchestonew
channelinthesamegroup.
Group scan: Pressandholdthescanbuttonfor3seconds.Findsanew
groupandselectsanopenchannelinthatgroup.(Donotuseinmultiple
systemsetupsunlessallsystemsaremovedtothesamegroup.)
Locking and Unlocking the Transmitter
Lockingthetransmitterpreventsaccidentalchangesduring
performances.
To lock the controls:
Withthetransmitteroff,holdthepowerbutton
downuntilthegreenLEDflashes(~5seconds)
To unlock the controls: Withthetransmitteron,holdthepowerbutton
downuntilthegreenLEDflashes(~5seconds)