User’s Manual
Foreword Thank you for purchasing this WiFi video camera. It has an elegant appearance and many functions . Prior to use, please read this user’s manual carefully so as to show its performance and extend its service life to maximum. We hope that this product can meet your needs and accompany you at your side all the time.
System Requirements System Requirements MSDC Microsoft Window 2000,XP, Vista, 7,8 Mac OS X ver: 10.0.0 or above version CPU Intel Pentium of more than 1GB Hz or other CPU with equivalent performance Internal Memory Larger than 1GB Sound Card and Display Card The sound card and video card shall support DirectX8 or higher version. CD Driver Speed of 4 times or faster Hard Disk Free space of more than 2GB Others One standard USB1.1 or USB2.
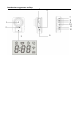
Introduction to appearance and keys 4 5 7 8 9 10 11 12 1 2 Power/Mode key 6 3 2.
1. Lens 2. Micphone 3. LCD display 4. USB port/ Micro SD card 5. Power / charger indicator 6. Power key 7. The model indicator 8. Mode key 9.busy indicator 10. Shutter key 4 11. Wifi light 12.
LCD display icon : :Picture mode; :Video mode; :Micro SD card; :Timelaps mode; :WIFI ICON :The battery icon :The timer/counter 5
Start using _______ 1. Connect the camera to the computer for charging, at this time, the charging indicator will be in blue, and it will be off after charging. Generally, it takes 2-4 hours to charge the battery. 2. Use the storage card 1. Push the TF card into the slot till it is in place as per the instruction in concavely engraved words by the storage card slot. 2. To take out the TF card, press the tail of the storage card inwardly softly and it will be popped out.
3.2. Power off: Hold on Power key for 3 seconds when the camera is in the idle state to turn it off. 3.3. Power off when the camera is lack of electricity. When electrical quantity of the battery is very low, an icon of will be displayed on the LCD screen, prompting you to charge it in time. When the icon turns red and flickers, the camera will be turned off automatically. 4.
LCD timer timing starts automatically, if you want to stop filming is pressing the shutter once again, if the memory card is full or low battery will automatically stop filming. The video is a period of 3 minutes by default. 7. Photo operation Press MODE key transfer to take photos mode, and then press the shutter button can take a photo. The machine will automatically count the LCD. 8 Timelaps mode Press MODE key transfer to timelaps mode,Press the shutter button,The machine start to shrink .
APP (for Android and iOS System) 1/5 I. How to Obtain the APP Installation Program 1. For the Android System, you can search “SYMAGIX2” in the Play Store to obtain corresponding installation programs, and then you can install them according to the indicated steps or through scanning the two-dimensional code . 2.
II. Camera WIFI and System Applications Android Applications 1. Please install the SYMAGIX2 application program (provided by the Supplier or the Internet) for the Android mobile phone or tablet PC, and then the Display Screen will show the Icon ; 2. Insert a Storage Card into the Camera and then power it on. Press the WIFI key to conduct WIFI connection, and the Screen of the Camera will show the WIFI signal Icon with the external screen revealing WIFI Connecting. 3.
4 1. Resolution 5 2. White Balance 1 2 3 3. Settings (Enter Settings Menu) 4. Wi-Fi Signal Icon 5. Camera’s Battery Status Icon 6. Enter the Playback Mode 7. Shutter Button 8.Video Mode 9. Photo Mode 6 7 8 9 10 10. Timelaps Mode IOS Applications 1. Please install the SYMAGIX2 application program (provided by the Supplier or the Internet) for the IOS mobile phone or tablet PC, and then the Display Screen will show the Icon ; 2. Insert a Storage Card into the Camera and then power it on.
4. Tap and enable the Application Program Icon on the IOS mobile phone or tablet PC; you can directly view the preview picture transmitted by the Camera (see the following picture), and then conduct relevant operations. 1 2 3 4 1. DV battery icon 2. Video resolution 3. White balance 4. Setup (enter setup menu) 9 5. Enter Playback mode 6. Timelaps Mode 7. Photo mode 8. Video mode 9.
Notes: 1. If you need to record videos or download pictures using your mobile phone or tablet PC, please insert one TF card for your camera; 2. When the Camera has been successfully connected with your mobile phone or tablet PC, the WIFI Indicator Light will be on.
Technical Parameters Image Sensor 5.0 Million Image Sensor Function Modes Video recording mode, shooting mode and Timelaps Lens F3.0 , f=2.1mm LCD Display Screen 888 Photo Definition Ratio The default 2M, with APP adjustable 2M / 5M mode digital screen FHD:1920x1080(30fps)、HD:1280x720(60fps)、 Video Definition Ratio HD:1280x720(30fps).with APP adjustable . Storage Media TF Card (32GB at most) File Formats Videos(MOV), H.264 Compressed Format; USB Port USB 2.
Note: 1. A TF card must be inserted if you need to take a photo, record a video, or download files on the terminal; 2. The Wi-Fi indicator will remain on when the terminal is connected to DV. Warning: Changes or modifications to this unit not expressly approved by the party responsible for compliance could void the user’s authority to operate the equipment. NOTE: This equipment has been tested and found to comply with the limits for a Class B digital device, pursuant to Part 15 of the FCC Rules.
However, there is no guarantee that interference will not occur in a particular installation. If this equipment does cause harmful interference to radio or television reception, which can be determined by turning the equipment off and on, the user is encouraged to try to correct the interference by one or more of the following measures: the Reorient or relocate the receiving antenna. Increase the separation between the equipment and receiver.
Shielded cables must be used with this unit to ensure compliance with the Class B FCC limits. FCC Radiation Exposure Statement The device has been evaluated to meet general RF exposure requirement. The device can be used in portable exposure condition without restriction. FCC ID:This device complies with Part 15 of the FCC Rules.
18