Showdesigner 1024 ORDERCODE 50720
Congratulations! You have bought a great, innovative product from Showtec. The Showtec Showdesigner 1024 brings excitement to any venue. Whether you want simple plug-&-play action or a sophisticated DMX show, this product provides the effect you need. You can rely on Showtec, for more excellent lighting products. We design and manufacture professional light equipment for the entertainment industry. New products are being launched regularly. We work hard to keep you, our customer, satisfied.
Showtec Showtec Showdesigner 1024™ Product Guide Warning..…...................................................................................…………………………………………................. Safety-instructions…………………………………………………………………………………….…..................... Operating Determinations……………………………………………………………………………....................... 2 2 3 Description..…..............................................................................……….……………………………….…............... Features…….……………………………………………………………………………………….……...
WARNING CAUTION! Keep this device away from rain and moisture! FOR YOUR OWN SAFETY, PLEASE READ THIS USER MANUAL CAREFULLY BEFORE YOUR INITIAL START-UP! SAFETY INSTRUCTIONS Every person involved with the installation, operation and maintenance of this device has to: be qualified follow the instructions of this manual CAUTION! Be careful with your operations.
Repairs, servicing and electric connection must be carried out only by Showtec. For replacement use fuses of same type and rating only. This device falls under protection class I. Therefore it is essential to connect the yellow/green conductor to earth. WARRANTY: Till one year after date of purchase. OPERATING DETERMINATIONS This device is not designed for permanent operation. Consistent operation breaks will ensure that the device will serve you for a long time without defects.
Description of the device Features The Showdesigner is a light controller from Showtec and features: • 1024 DMX control channels, compatible with DMX512/ 1990 standard. • Control up to 32 fixtures, each with up to 32 channels. • 32 Sliders on the frontpanel for easy and fast control of all the channels in the fixture. • Big size LCD display with language selection Chinese/ English. • 48 scenes for direct output and simultaneous running.
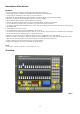
Controller Front 1) Fixture selection buttons There are 32 buttons with 32 fixed DMX channels, all for direct fixture selection. If a fixture is selected, the LED indicator in the button will light. If the LED indicator of the fixture selection button blinks, the LED indicator of the according fader will show the status of the fixture. Either one or several fixtures at the same time can be activated or deactivated. E.g.
Exit: Use this button to exit the program or delete mode. Blackout: Use this button to kill all output. Pause: Press this button to pause all running chases. Program: Press this button to enter Program-mode. ADD: Press this button to add a step while programming a chase or chase group. ALL: When a chase is running, press this button to adjust the speed and slope of all the steps in the chase. DEL: Use this button to delete a scene/ chase/ chase group/ step while programming.
E/XY: Use this button to switch between either speed/slope or pan/tilt function for the jog wheels: Speed/slope mode: LED is off. Pan/ tilt mode LED is on. The speed/ slope for a chase group can only be adjusted by X/speed. <=/SETX, =>/SETY: Use this button to change the direction of a running chase. Or use this button to switch between pan/tilt movement of the jog wheels. SelChase: Press this button to select a running chase in order to change the settings.
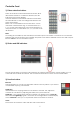
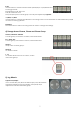
Controller Backside Fig. 2 1) DMX OUT 1+2: These DMX-outputs can control the first 512 DMX channels. 2) DMX OUT 3+4: These DMX-outputs can control the second 512 DMX channels (513-1024). 3) UPDATA: Data port (only used by Showtec to read out an error logfile). 4) Microphone. 5) Audio Input: This jack accepts a line level audio input signal ranged from 100 mV to 1Vpp. 6) Main Fuse T1,5A/250V. 7) Power ON/ OFF. 8) IEC Connector.
Installation Remove all packing materials from the Showdesigner 1024. Check that all foam and plastic padding is removed. Screw the equipment into a 19" rack. Connect all cables. Always disconnect from electric mains power supply before cleaning or servicing. Damages caused by non-observance are not subject to warranty. Set Up and Operation Before plugging the unit in, always make sure that the power supply matches the product specification voltage.
2.2 Create a scene Step Description 1 Select the desired fixtures. 2 Move the faders to adjust the lighting effects. 3 Press Program to enter programming mode. 4 Select sc1, sc2 or sc3 to store the scene. 5 Select a number from 1--16 to store the scene. 6 After saving the scene into the number button, it will automatically exit the programming mode. Note: The LED indicators of the faders with manual output will be lit or flashing (output value = 0). The values will all be saved into the scene.
2.4 Create a chase There are three ways to create a chase: A. Create the chase by adjusting the faders. B. Create scenes first and then select the scenes into the chase. C. Use a mix of the two ways described above. A: Create a chase by adjusting the faders. Step Description 1 Press program to enter programming mode 2 Select chase1, chase 2 or chase 3 to store the chase.
C: Create the scenes first and then add the scenes into a chase. Step Description 1 Create scenes (see "Create a scene"). 2 Press program to enter programming mode. 3 Select Chase1, Chase2 or Chase3 to store the chase. 4 Select a number from 1--16 as the number of the chase, If the LED indicator of the number button is lit, there is already a chase stored in that number. 5 Now, the light effect can be selected in the scenes or created by adjusting the faders.
Following parameters can be edited while a chase is running: Press =>/SETY Chase runs forward Press <=/SETX Chase runs backward Press Auto Chase runs under auto mode Press Music Chase runs under sound activation mode Press ALL Then adjust X/Speed (jog wheel) to adjust the running speed. Y/Slope is for slope adjustment. If ALL is not selected, the adjustment is for the speed/ slope of a single scene step. Before adjustment, please make sure E/XY is deactivated (LED indicator off).
2.8 Master control assignment There are up to 16 master controls available in the Showdesigner 1024. Each of them can be assigned to any channel. Step Description 1 Press Program to enter the programming mode. 2 Press Group 2 to select a master control. 3 Select one of the number buttons 1-16, as the number to store the master control 4 Move the channel faders you want to assign to the master control until the LED indicators of the faders are lit. 5 Press the number button again to save and exit.
2.12 Setup of slope channels The channels that have been assigned to the jog wheels will automatically have a slope assigned when the chase is running. Other channels can be set up with a slope also. Step Description 1 Press program to enter programming mode. 2 Press SlopeSet 3 Select the desired fixture. 4 Push the channels you want to setup with slope until the LED indicators of the faders are lit. Press Release and move the fader to release the selected channel. 5 Press SlopeSet again.
Maintenance The Showtec Showdesigner 1024 requires almost no maintenance. However, you should keep the unit clean. Disconnect the mains power supply, and then wipe the cover with a damp cloth. Do not immerse in liquid. Do not use alcohol or solvents. Keep connections clean. Disconnect electric power, and then wipe the DMX and audio connections with a damp cloth. Make sure connections are thoroughly dry before linking equipment or supplying electric power.
Product Specification Model: Showtec Showdesigner 1024 Power input : AC 100V-240V, 50/60Hz, 40W DMX-Output: 3-pin female XLR Audio Input: 100 mV~1 Vpp Fuse: F1.5A 250V 5x20 mm Dimensions : 480 x 380 x 95 mm (LxWxH) Weight : 6,9 kg Design and product specifications are subject to change without prior notice. Website: www.Highlite.nl Email: service@highlite.