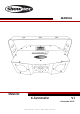
MANUAL ENGLISH X-Terminator V1 Ordercode: 43157 Highlite International B.V.
X-Terminator Table of contents Warning ...............................................................................................................................................................................2 Unpacking Instructions .................................................................................................................................................2 Safety Instructions .........................................................................................................
X-Terminator Warning Unpacking Instructions Immediately upon receiving this product, carefully unpack the carton and check the contents to ensure that all parts are present, and have been received in good condition. Notify the dealer immediately and retain packing material for inspection if any parts appear damaged from shipping or the carton itself shows signs of mishandling. Save the carton and all packing materials.
X-Terminator Safety Instructions Every person involved with the installation, operation and maintenance of this device have to: • be qualified • follow the instructions of this manual Before the initial start-up, please make sure that there is no damage caused by transportation. Should there be any, consult your dealer and do not use the device.
X-Terminator • • • • • • • • • • • • • • • • • • • • • • Always check and position the laser before anybody enters the room, when the laser is facing an area with people Always keep case closed while operating. Always allow free air space of at least 50 cm around the unit for ventilation. Always disconnect power from the mains, when device is not used or before cleaning! Only handle the power cord by the plug. Never pull out the plug by tugging the power cord.
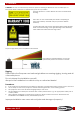
X-Terminator Laser safety for a Class 3B Laser Product Laser Light is different from any other light source with which you may be familiar with. The light from this product can potentially cause instant eye injury if not set up and used properly. Laser light is thousands of times more concentrated than light from any other kind of light source. This concentration of light power can cause instant eye injuries, primarily by burning the retina (the light sensitive portion at the back of the eye).
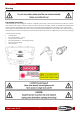
X-Terminator CAUTION: The use of corrective eye wear or optics for viewing at distances such as telescopes or binoculars within a distance of 100mm may pose an eye hazard. This laser product is a Class 3B laser and has an interlocked housing. There are no user serviceable parts inside. Tampering or removing warranty seals will void your products limited warranty.
X-Terminator The X-Terminator can be placed on a flat stage floor or mounted to any kind of truss with a clamp. Improper installation can cause serious damage to people and property! Connection with the mains Connect the device to the mains with the power-plug. Always pay attention, that the right color cable is connected to the right place.
X-Terminator Return Procedure Returned merchandise must be sent prepaid and in the original packing, call tags will not be issued. Package must be clearly labeled with a Return Authorization Number (RMA number). Products returned without an RMA number will be refused. Highlite will not accept the returned goods or any responsibility. Call Highlite 0031-455667723 or mail aftersales@highlite.nl and request an RMA prior to shipping the fixture.
X-Terminator Description of the device Features The X-Terminator is a laser effect with high output and great effects.
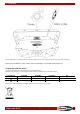
X-Terminator Backside Fig.
X-Terminator Remote Control Button Function Description On / Off Power on / off Auto Mode Sound-controlled Mode Set the auto mode Set the sound-controlled mode LED Mode Set the LED mode Laser Mode Set the laser mode Flash Mode Set the flash mode Auto / Sound switch Switch between auto / sound modes Pause Play/pause the show Color changing Select the LED color Numeric keys Program speed adjustment (1-9) Attention: Any settings saved with the remote control will be stored until the syste
X-Terminator The Interlock plug/remote plug and safety keys are included in the box. The interlock is the “included-in-the-box” successor for the optional remote interlock (51316) They should be kept with the X-Terminator laser !!! The following safety precautions should be followed: ● The interlock plug should be placed on the backside (16) of your X-Terminator laser. ● The keys should be put into the lock (15) of your X-Terminator laser.
X-Terminator Control Modes There are 4 modes: Stand-alone (built-in programs) Sound-controlled Master/Slave DMX-512 (11CH) One X-Terminator (Stand-alone) 01) Fasten the effect light onto firm trussing. Leave at least 0,5 meter on all sides for air circulation. 02) Always use a safety cable (ordercode 70140 / 70141). 03) Plug the end of the electric mains power cord into a proper electric power supply socket. 04) When the X-Terminator is not connected by a DMX-cable, it functions as a stand-alone device.
X-Terminator Multiple X-Terminators (DMX Control) 01) Fasten the effect light onto firm trussing. Leave at least 1 meter on all sides for air circulation. 02) Always use a safety cable (ordercode 70140 / 70141). 03) Plug the end of the electric mains power cord into a proper electric power supply socket. 04) Use a 3-p XLR cable to connect the X-Terminators and other devices. 05) Link the units as shown in Fig.
X-Terminator Fixture Linking You will need a serial data link to run light shows of one or more fixtures using a DMX-512 controller or to run synchronized shows on two or more fixtures set to a master/slave operating mode. The combined number of channels required by all the fixtures on a serial data link determines the number of fixtures the data link can support. Important: Fixtures on a serial data link must be daisy chained in one single line.
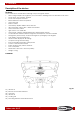
X-Terminator Control Panel A) B) C) D) E) LED display MODE button UP button DOWN button ENTER button Fig. 05 Control Mode The fixtures are individually addressed on a data-link and connected to the controller. The fixtures respond to the DMX signal from the controller. (When you select the DMX address and save it, the controller will display the saved DMX address the next time.
X-Terminator Menu Overview Ordercode: 43157 17
X-Terminator Main Menu Options Built-in programs Sound-controlled Master/Slave DMX-512 System Settings 1. Built-in Shows 01) Press the MODE button until the display shows 02) Press the ENTER button to enter the menu. . 03) Press the UP and DOWN buttons to run one of the built-in shows: 04) Once your preferred show has been chosen, press the ENTER button to proceed to speed settings. 05) Press the UP and DOWN buttons to adjust the speed of your preferred built-in show: . .
X-Terminator 5. System Settings 01) Press the MODE button until the display shows . 02) Press the ENTER button to enter the menu. 03) There are 3 options available. Press the UP and DOWN buttons to toggle between them: Power saving mode System Reset Test Mode If the display shows , press the ENTER button to enter the menu. 04) Press UP and DOWN buttons to choose between . 05) If the device is set to ON, it is operating in the power saving mode.
X-Terminator 11 channels Channel 1 – Color, Lens A 0-24 Laser off 25-49 Red 50-74 Green 75-99 Blue 100-124 Red + Green 125-149 Red + Blue 150-174 Green + Blue 175-199 Red + Green + Blue 200-224 Color switch 225-255 Color flow Channel 2 –Strobe Effect, Lens A 0-9 Off 10-254 Strobe speed, from slow to fast (Ch1 must be set between 25-199 ) Color change speed, from slow to fast (Ch1 must be set between 200-255 255 Sound control ) Channel 3 – Rotation effect, Lens A 0-4 Off 5-127 Clockwise rotation, from slow
X-Terminator Channel 7 – Color, Laser 0-9 Off 10-49 Red on 50-89 Green on 90-129 Red + Green on 130-169 Red + Green strobe 170-209 Green on + Red strobe 210-255 Red/Green (alternating strobe) Channel 8 –Strobe Effect, Laser 0-9 Off 10-254 Strobe speed, from slow to fast 255 Sound control Channel 9 – Rotation effect, Laser 0-4 Off 5-127 Clockwise rotation, from slow to fast 128-133 Stop 134-255 Counterclockwise rotation, from slow to fast Channel 10 – Strobe 0-9 Off 10-19 Program 1, from slow to fast 20-29 P
X-Terminator Maintenance The X-Terminator requires almost no maintenance. However, you should keep the unit clean. Otherwise, the fixture’s light-output will be significantly reduced. Disconnect the mains power supply and then wipe the cover with a damp cloth. Wipe the front glass panel clean with glass cleaner and a soft cloth. Do not use alcohol or solvents. The front glass panel will require weekly cleaning, as smoke-fluid tends to build up residues, reducing the light-output very quickly.
X-Terminator Problem Probable cause(s) Remedy One or more fixtures do not function at all. No power to the fixture. ● Primary fuse blown.. ● Fixtures reset correctly, but all respond erratically or not at all to the controller. The controller is not connected. 3-pin XLR Out of the controller does not match XLR Out of the first fixture on the link (i.e. signal is reversed). ● ● Connect controller. Install a phase reversing cable between the controller and the first fixture on the link.
X-Terminator Product Specifications Model: Input Voltage: Continuous Power: Fuse: Dimensions: Weight: X-Terminator AC 100-240V, 60/50Hz 50 Watt 1,6AL/250V 335 x 215 x 197 mm (LxWxH) 2,5 kg Operation and Programming Signal pin OUT: Set Up and Addressing: DMX Channels: Signal input: Signal output: pin 1 earth, pin 2 (-), pin 3 (+) Red LED display for all settings 2CH, 11CH 3-pin DMX signal connector IN 3-pin DMX signal connector OUT Electro-mechanical effects Laser Class: Laser Power: Light Source: LED C
X-Terminator Dimensions Ordercode: 43157 25
X-Terminator Ordercode: 43157 26
©2015 Showtec