
User Manual

FCC and IC CERTIFIED
This device complies with FCC Part 15 and ASS 210 of Industry
Canada Operation is subject to the following two
conditions: (1) This device may not cause harmful interference, and (2)
this device must accept any interference, including interference that
may cause undesired operation of the device.
Changes or modifications not expressly approved by the manufacturer
could void the user's authority to operate the equipment.
For additional information or help, see Owner's Manual or contact
Customer Service:
1-800-35-GENIE
Your Local Distributor: 1-800-OK-Genie
Customer Service
22790 Lake Park Blvd.
Alliance, Ohio 44601-349B
www.geniecompany.com
INSTRUCTIONS
1 IMPORTANT INFORMATION
NOTE: Use only with Series II Electronics. Operates up to three
Intellicode Garage Door Openers manufactured after
1997. There are no Security Code Switches inside the
Door Operators or Transmitters.
WARNING
Moving Door can cause serious injury
or death.
* Do Not install transmitter unless the door
operator's safely reverse works as required
by the door operators manual.
* Wall control must be mounted in sight of door,
at least 5 feet above floor and clear of moving
door parts
* Keep people clear of opening while door is
moving.
* Do Not allow children to play with the
transmitter or door operator.
If safely reverse does not work properly
* Close door then disconnect operator using
the manual release handle
* Do Not use transmitter or door operator.
* Refer to Door and Door Operator Owner's
Manuals before attempting any repairs.
2 TO PROGRAM THE RECEIVER
A different Transmitter Code is set at the factory for each
INTELLICODE Transmitter.
Step 2-1 Locate the Receiver Learn Code Button and Radio
Signal Indicator on the Power Head of your Door
Operator.
Step 2-2 Press and release the Learn Code Button Fig 1
* The Radio Signal indicator will blink approximately 2
times per second.
Step 2.3 Press a Transmitter Button once within 30 seconds.
* The Radio Signal Indicator stays lit-SOLID.
Step 2.4 Press the same Transmitter Button. The Radio Signal
Indicator will go out (the Transmitter Code is now stored
in (Receiver memory).
NOTE: If a second Transmitter Code is not confirmed within 30
seconds or if a different Transmitter Code is sent, the
Radio Signal Indicator will blink approximately 4 times per
second, then programming will stop. If programming stops,
repeat previous steps.
Step 2-5 Repeat previous steps for each Transmitter to be
learned.
NOTE: A maximum of 7 Transmitter, Wireless Keypad and other
access device Codes can be stored into Receiver Memory at
one time. If a Transmitter becomes lost or if you want to delete
a Transmitter, Wireless Keypad or other access device,
proceed to step 3 ERASING ALL RECEIVER MEMORY.
NOTE: If you are replacing a lost or stolen Transmitter: (1) Erase ALL
Transmitter Codes from the Receiver memory. (2) Reprogram
the Receiver with the remaining Transmitters.
3 ERASING ALL RECEIVER MEMORY
Step 4-1 Press and HOLD the Learn Code Button for 10 seconds or
until Radio Signal Indicator stops flashing and goes out.
All Transmitter Codes are erased
from Receiver memory.
Step 4-2 Reprogram the Receiver with the remaining Transmitter
Codes (Repeat Steps 2-2 through 2-4).
4 BATTERY INSTALLATION
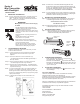
Step 5-1 Battery replacement (your Transmitter is battery powered).
* Remove rear battery cap by releasing locking clip.
* Install new AAA battery with positive foward
5 TRANSMITTER OPERATION
* Point Transmitter at the garage door and press the
transmitter button. Door will move.
* Press the Transmitter Button again and the door will stop.
* Press the Transmitter Button again and the door will move
the other way. The door automatically stops at the end of the
open or close cycle.
6 FLASHLIGHT OPERATION
* Simply press the Flashlight on/off Button to turn on and
off the flashlight.
Transmitter
Button
Locking Clip
Postive goes
Foward
Flashlight
On/Off
Series II
Mini Transmitter
with Flashlight