
Installation Sheet


www.mirabelleproducts.com
© 2017 Ferguson Enterprises, Inc. 469008 05/17
4. Insert the lip of trimmed apron up under tub edge, between the wooden blocks and the front tub lip. Check to see that you have cut the apron to the
proper height. Remove apron.
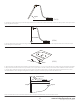
5. Using a plumb bob or level, project front edge of tub lip down to oor surface and make a mark on oor. Repeat several times across front of tub.
Draw a straight line at these marks.
6. Attach at least 3 wooden blocks (not provided), to be used as back-stops, (1”x1” or 2”x2” and at least 6” in length), along the inside of the line drawn
in Step 5. Secure blocks with screws or nails if your oor is wood. If your oor is concrete or tiled you will need to use an adhesive to attach the blocks.
7. For nal apron installation and to allow for removal if necessary in the future, adhere apron to wooden back support blocks with silicone or other
removable adhesive. Place a straight board against front bottom of apron to hold it rmly in place while the adhesive cures.
Note: Final installation will leave clearance between both ends of apron and nished wall to allow for future removal.
2
(FIG.3)
(FIG.4)
Apron
Plumb Bob
Line
Block
(FIG.5)
Tub
Apron
Gap
Finished Wall