
Installation Guide


ELECTRICAL CONNECTION
INSTALLATION INSTRUCTIONS
Install a separate 120 VoIt 15/20 Amp dedicated circuit with GFCI (Ground¬Fault-Circuit-Interruptor)
protecting. With a No.8 solid copper wire, bond the heater and hydro massage bathtub pump to the
homes electrical panel or approved local bonding point. A bonding lug has been provided on the
heater. First you must locate the pump and Heater Ready fitting supplied with your hydro massage
bathtub.
Note: Photos are for illustration purposes only. The Heater Ready fitting in your particular application
may be located anywhere in the plumbing mentioned.
1. Route two separate branch circuits (see illustration below) to the junction box near the bathtub.
*Each branch circuit MUST BE GFCI PROTECTED.
2. Use solid copper conductors only.
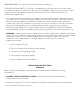
3. Insure the heater and pump are properly GROUNDED and BONDED as required. A bonding lug
suitable for No.8 AWG wire has been provided on the heater (most pumps provided with the
hydro massage bathtub will also include a bonding lug). A Heater Ready fitting has been supplied
by the bathtub manufacturer to allow for ease of heater installation. (Photo #1)
SEPARATE GFCI PROTECTED CIRCUITS
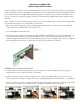
1. Carefully loosen Heater Ready fitting nuts and remove the Heater Ready fitting ensuring that
ridged gaskets stay in place as shown in Photo #2.
2. Making sure that gaskets remain installed on the existing threaded tailpiece fittings, insert the
heater into place as shown in Photo #3. (Heater may be positioned in any direction, i.e. up/down)
3. Once the heater is in place, inspect heater and gaskets for proper alignment. Tighten heater union
nuts to insure a proper seal. Photo #4 shows a typical completed heater installation.
Photo #1
Photo #2 Photo #3
Photo #4