
Safety Instructions


3
1: Find the fill nipple provided in the plastic bag and screw it into the
threaded hole in the top of the compressor. There is Teflon sealing
tape pre-installed on the fill nipple, do not remove. Use a wrench to
fully tighten.
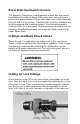
2: Remove the front cover after unplugging the power and all air lines
by unscrewing the four bolts on the sides.
3: Take the vent knob shaft and screw it part way into the upper
threaded hole just above the output nipple in the front.
4: Find the black retaining bolt with the wide head in the parts bag
and screw that into the lower
right threaded hole. You might
have to screw the vent knob in
and out to get the retaining
screw into place and seated up
against the block. Once
properly in place, the vent knob
shaft should be restrained by
the retaining bolt, so it doesn’t
unscrew out of the block.
Unscrew the vent rod all the
way OUT to seal and pump up
to pressure.
5: Reinstall front cover before use.
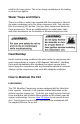
Shop Air Compressor for 125 psi Feed (not
supplied)
To achieve minimum fill times, the F10 ShoeBox Compressor can
handle up to 125 psi air from a small oil free air compressor. This acts
like a “first stage” and reduces the fill times by a factor of eight. Do
NOT run the ShoeBox above 125 psi. Doing so will overload the
first stage and reduce o-ring life.
Air Feed Hookup
Before attaching input hose, set the output pressure of the shop
compressor to 125 psi or less. Attach the hose from your shop
compressor to the fill nipple you installed on top of the ShoeBox
Compressor. Attach a high pressure rated hose to output port on the
front of the compressor. Attach other end of hose to the fill nipple on
your psi rated tank. Unscrew the vent knob above the output port on