
User Manual
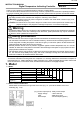

7
6. Unit operation
After the unit is mounted to the control panel and wiring is completed, operate the unit following
the procedures below.
(1) Turn the power supply to the BCS1 ON.
(2) Input each set value.
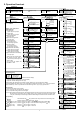
Refer to “5. Operation flowchart”.
(3) Turn the load circuit power ON.
Control action starts so as to keep the control target at the SV (desired value).
7. Basic settings
Basic setting method for the Main setting mode and Auto-tuning Perform/Cancel will be described.
Upper characters indicate setting item characters on the PV display.
Lower characters indicate default value on the SV display.
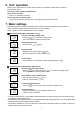
Main setting mode (When setting SV to 100 )
(1)
Proceed to the Main setting mode.
Press the key in the PV/SV display mode.
The unit proceeds to the Main setting mode.
(2)
Set SV (desired vlaue).
Set SV with the or key.
,
(3)
Register the SV.
Register the SV by pressing the key.
The unit reverts to the PV/SV display mode.
(4)
Control starts.
Control starts so as to keep the measuring temperature at 100 .
Auto-tuning (AT) Perform/Cancel (PID control)
(1)
Proceed to the Sub setting mode.
Press the key while pressing the key in the PV/SV display mode.
The unit proceeds to the Sub setting mode.
+
(2)
Select AT/Auto-reset Perform/Cancel.
Select AT Perform with the key, or
select AT Cancel with the key.
,
(3) Confirm AT Perform/Cancel.
Press the key. The unit reverts to the PV/SV display mode.
(4)
AT Perform/Cancel
While AT is performing, the AT indicator flashes, and
it goes off if AT is cancelled.
• In order to decide each P, I, D and ARW value automatically, the auto-tuning (AT) process has been made
to fluctuate to get an optimal value.
• Sometimes the auto-tuning (AT) process will not fluctuate if auto-tuning is performed at or near room temperature.
Therefore auto-tuning (AT) might not finish normally.
• Auto-reset is available for P or PD control action. Auto-reset is cancelled in approx. 4 minutes. It cannot be
released while performing this function.