
User Manual

6
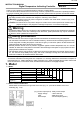
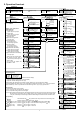
High limit alarm High/ Low limits alarmLow limit alarm
Alarm
action
Alarm
action
Alarm
action
High/Low limit range alarm Process high alarm
Process low alarm
High limit alarm with standby
High/Low limits alarm with standbyLow limit alarm with standby
OFF
ON
A 1 hysteresis
SV
+
OFF
ON
A 1 hysteresis
SV
+
OFF
ON
A 1 hysteresis
SV
OFF
ON
A 1 hysteresis
A1 value
SV
OFF
ON
A 1 hysteresis
OFF
ON
A 1 hysteresis
SV
+
OFF
ON
A 1 hysteresis
SV
SV
OFF
ON
A 1 hysteresis
OFF
ON
A 1 hysteresis
+
: Standby functions..
A1 value
A1 value
A1 value
A1 value
A1 value
A1 value
A1 value
A1 value A1 value
A1 value A1 value
A1 value A1 value
A1 value A1 value
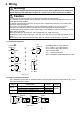
Characters used in this manual:
Indication
Number, /
-1 0 1 2 3 4 5 6 7 8 9
Indication
Alphabet
A B C D E F G H I J K L M
Indication
Alphabet
N O P Q R S T U V W X Y Z
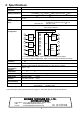
Indication after power-on
After the power is turned on, the PV display indicates the input type characters and temperature unit, and
the SV display indicates the input range high limit value for approximately 3 seconds. See (Table 5-1).
(Table 5-1)
Input
PV display SV display PV display SV display
K
J
Pt100
During this time, all outputs and the LED indicators are in OFF status.
Control will then start indicating the PV (process variable) on the PV display and SV (desired value) on
the SV display.
While control output OFF function is working, the PV display indicates .
To cancel the control output OFF function, press the key for approximately 3 seconds.
Alarm 1 (A1), 2 (A2) action
(Table 5-2) Alarm 1 (A1), 2 (A2) type selection [ , ] (Default: : No alarm action)
• A1: Alarm 1
For Alarm 2 (A2), Read “A2” for “A1”.