
Data Sheet

-13-
Aligning the Headstock and Tailstock on the Lathe
The versatile feature of Sherline machines that allows the
headstock to be removed or rotated for taper turning and
angle milling keeps us from being able to lock the headstock
in perfect alignment. Precision ground alignment keys and
accurate adjustment at the factory, however, make the machines
highly accurate. In standard form, alignment should be within
.003" (.08 mm). This should be more than acceptable for most
jobs you will attempt.
Only someone new to machining would talk about “perfect”
alignment. Machinists speak instead in terms of “tolerances,”
because no method of measurement is totally without error.
We believe the tolerances of your machine are close enough
for the work for which it was intended, however, for those
searching for maximum accuracy, here are some tips for
maximizing the accuracy of your machine.
Loosen the headstock, push it back evenly against the alignment
key and retighten. This will maximize the accuracy of the
factory setting. To achieve greater accuracy, you will have
to be willing to sacrice one of the better features of your
lathe or mill; that is, its ability to turn tapers and mill angles
in such a simple manner.
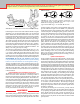
HEADSTOCK—If you choose total accuracy over versatility or
need it for a particular job, proceed as follows. Remove the
headstock and clean any oil from the alignment key and slot
and from the area of contact between bed and headstock.
Replace the headstock, pushing squarely against the key
and retighten. Take a light test cut on a piece of 1/2" to 3/4"
diameter by 3" long aluminum stock held in a 3-jaw chuck.
Use a sharp-pointed tool to keep cutting loads low so as not
to cause any deection of the part. Measure the diameter of
both machined ends. If there is a dierence, the headstock
is not perfectly square. Now, without removing the key, tap
the headstock on the left front side (pulley end) if the part is
larger at the outer end. Tap on the right front side (chuck end)
if the part is larger at the inner end.) You are trying to rotate
the headstock ever so slightly when viewed from the top until
the machine cuts as straight as you can measure. There should
be enough movement available without removing the key, as
its factory placement is quite accurate.
Take another test cut and remeasure. Repeat this procedure
until you have achieved the level of perfection you seek. Then
stand the lathe on end with the alignment key pointing upward
and put a few drops of LocTite® on the joint between key
and headstock. Capillary action will draw the sealant in, and
when it hardens, the key will be locked in place. We prefer this
method to “pinning” the head with 1/8" dowel pins, because
it oers you the option to change your mind. The headstock
can be removed by prying with a screwdriver blade in the
slot between the bottom of the headstock and the lathe bed
to break the LocTite® loose should you wish to be able to
rotate the headstock again.
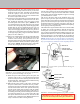
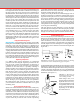
TAILSTOCK—To maximize the machine’s tailstock alignment,
rst make sure that there are no chips caught in the dovetail
of the bed and no chips or dents in the taper of your tailstock
center. Now put a 6" long piece between centers and take a
long, light test cut. Measurements at either end will tell you
if you need to use an adjustable tailstock tool holder in the
tailstock to achieve better tailstock alignment. We manufacture
adjustable tailstock tool holders (P/N 1202, -03, -04, -06) and
General questions about tools or accessories? See our “Frequently asked questions” section at sherline.com/standard-faq/.
an adjustable live center (P/N 1201) that can help you attain
near perfect alignment at the tailstock should your job require
it. Instructions for their use are included with each item.
Remember that unless you drill very small holes (less than
1/64") or turn a lot of long shafts, you are giving up a very
useful feature to solve a problem which can usually be
handled with a few passes of a good mill le. The inaccuracy
inherent in any drill chuck is such that perfect machine
alignment is meaningless unless you use adjustable tailstock
tool holders.
Squaring up Your Mill
The following tips are taken from the Model 2000 mill
instructions. Though the 8-direction mill is shown in the
examples, the same procedures would be used for aligning the
5000-series, and 5800-series mills, or any mill for that matter.
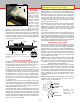
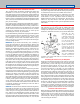
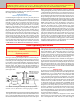
FIGURE 24—The
axes of movement of
a Sherline 8-direction
mill. Table left/right
movement is referred
to as the X axis. Table
in/out movement is
the Y axis. Headstock
up/down movement is
referred to as the Z
axis. The headstock can
also be rotated on its
saddle on Sherline mills
(Shown as movement
#4). Four additional
column movements
available on the model 2000 mill are also illustrated here as
numbers 5, 6, 7 and 8.
Determining the Level of Accuracy You Really Need
Squaring up a multi-direction mill can be a chore if you want
“perfection.” It is best to determine how accurate the setup
must be before you start. The larger a close tolerance part is
the better the setup required. An error of .001" (.025 mm)
per inch (25.4 mm) would be a very small error on a part .4"
(10 mm) long. However, a part that is 5" long would have
an error of .005". The type of machining that is going to be
performed also has a bearing on the quality of the setup. As
an example, a drilled hole doesn’t usually require the quality
of setup that would be used for a bored hole, (assuming the
hole is being bored for accuracy rather than for lack of a drill
of the proper size). The amount of work that will be done with
the setup should be considered too. If your setup is just to do
one particular job you only have to set it up close enough to
do that job. If the setup will accommodate future operations
as well, it should be adjusted to the tolerances of the most
critical job. For example, squaring up a mill and vise to work
on a number of precise parts is worth more of your attention
than setting up to drill one clearance hole in a non-critical part.
Limitations of the Production Process
Before starting you should realize that these mills are relatively
inexpensive machine tools. They have accurately milled slides
but the surfaces are not ground. To increase the accuracy of
a Sherline tool only a percentage point would dramatically
increase the price. We try to give a customer what we consider
“the most bang for the buck.”
X
Y
Z
4
5
6
7
8