
Instructions
The g99 command
G99 avoids retracting a drill all the way up to the original z-position between moves, thus
saving valuable time on a project that involves hundreds of holes.
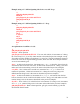
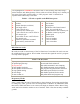
Example using a ¼" dia. drill and putting 8 holes ¼ " deep:
%
g00 g20 g40 g90 g80 z0.50
g91 g81 g99 x0 y0 z-0.30 r-0.45 f4
x1.5 y0 r0
x1 y0 L2
x0 y1
x-1 y0 L3
g98
g00 g90 g80 z0.50
x0 y0
m2
%
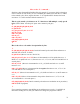
This program looks pretty much the same as the program that uses g98; however, there’s
a significant difference. Note the added r0 in line 4. The reason it’s needed is to cancel
out the r-0.45 in line 3. Remember, when we implemented the g99 command the z-axis
was located 0.45" above the position where the z-axis is now located. If you didn’t enter
the r0 the z-axis would rapid down one more time for 0.45" and break the drill. The x-1
in line 7 is to over-ride the x1 in line 5 that will control the direction on the x-axis the
holes are drilled in. Enter this program into EMC and run it without the drivers turned on
to watch the results, and you’ll realize why a complete understanding of these new
commands is necessary to avoid a lot of tool breakage and ruined parts.
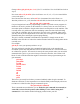
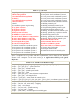
Last, but not least, I’ll write the program that we have just completed in the code that we
knew before learning about canned cycles.
%
g00 g20 g40 g90 z0.50
x0 y0
z0.050
g01 z-0.250 f3
g00 z0.050
x1.500
g01 z-0.250
g00 z0.050
x2.500
g01 z-0.250
g00 z0.050
x3.500
g01 z-0.250
g00 z0.050
y1
g01 z-0.250
g00 z0.050
75