
Instructions

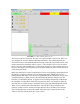
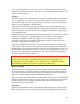
them is the window that shows the part of the program currently being executed. As the
program runs, the active line shows in white letters on a red background.
The first three buttons, [Open], [Run], and [Pause] do about what you’d expect. [Pause]
will stop the run right where it is. The next button, [Resume], will restart motion. They
are like “feedhold” if used this way. Once [Pause] is pressed and motion has stopped,
[Step] will resume motion and continue it to the end of the current block. Press [Step]
again to get the motion of the next block. Press [Resume] and the interpreter goes back to
reading ahead and running the program. The combination of [Pause] and [Step] work a
lot like single block mode on many controllers. The difference is that [Pause] does not let
motion continue to the end of the current block.
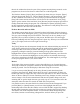
Feedrate Override and Auto Mode
The number buttons along the top of the main keyboard will change feed rate whenever
you are in auto mode. Pressing the gravé [`] gets you zero percent feed rate. One through
zero gets you ten through 100 percent feed rate. These keys can be very handy as you
approach a first cut. Move in quickly at 100 percent, throttle back to 10% and toggle
between [Feedhold] and 10% using the keyboard’s pause key. When you are satisfied that
you’ve got it right, hit the zero to the right of nine and go.
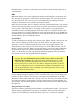
Verify
The [Verify] button runs the interpreter through the code without initiating any motion. If
verify finds a problem it will stop the read near the problem block and put up some sort
of message. Most of the time you will be able to figure out the problem with your
program by reading the message given and looking in the program window at the
highlighted line. Some of the messages are not real helpful. Sometimes you will need to
read a line or two ahead of the highlight to see the problem. Occasionally the message
will refer to something well ahead of the highlight line. This often happens if you forget
to end your program with a %, m2, m30 or m60.
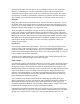
Restart
To the right of the program window is a space that will show a set of restart functions.
These pop in whenever a program is aborted or an EStop happens while the interpreter is
running or paused. You can also display or hide these using the view menu.
I’ve got to warn you that [Restart] can be risky. [Restart] reads down through the
program to the restart line. While it does this it sets up its “world model” so that it can
resume right where it stopped, but only if the tool is right where it was. Most of the time,
when we abort or EStop it’s because something went wrong. Perhaps we broke a tool and
want to change it. We switch to manual mode and raise the spindle, change tools, and
assuming that we got the length the same, get ready to go on. If we return the tool to the
same place where the abort was issued, the EMC will work perfectly.
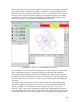
It is possible to move the restart line back or ahead of where the abort happened. If you
press the [Back] or [Ahead] buttons you will see a blue highlight that shows the
relationship between the abort line and the one on which the EMC stopped. By thinking
through what is happening at the time of the restart you can place the tool tip where it
will resume work in an acceptable manner. You will need to think through things like
tool offsets, barriers to motion along a diagonal line, and such before you press the
27