
Instructions


*NOTE: Sherline attempts to ship machines with the voltage setting preset to the proper
voltage for the customer’s location. Confirm this setting before turning the computer on
for the first time. If the setting is not correct, note that there are two switches that need to
be changed. The switch for the driver power supply is inside the computer case. Contact
Sherline before opening the case to change the voltage or for any reason. Breaking the
tamper-proof seal without authorization may void your warranty. Illustrated instructions
on how to locate and properly change the setting on this switch can be found at
www.sherline.com/voltage.htm.
Assembling your system
Getting your system up and running is a simple task. It consists of assembling your mill
and connecting it to the computer as follows:
Mill or Lathe
Unpack and assemble your machine according to the instructions included in the Sherline
Assembly and Instruction Guide packed with the machine.
Computer connections and starting up
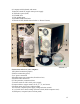
Unpack the computer and enclosed components. Connect the stepper motor cables
leading from the back of the computer to each of the three stepper motors. A fourth cable
is unused unless you have purchased an optional rotary table that can be connected here
as a 4th (A) axis.
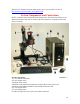
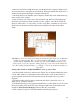
• If your keyboard and/or mouse have a USB plug, insert the USB plug into any available
USB port at the back of the PC. If you have a keyboard with a purple plug, insert it into
the purple connector at the back of the PC (#1 in the previous photo).
• If you have a mouse with a green plug, insert it into the green connector at the back of
the PC (#2 in the previous photo).
• Plug your monitor to the blue video connector (6).
• If not already connected, plug the free end of the 25-pin parallel cable in to the
parallel port (4).
• Insert the female end of the power cord into its receptacle (5) in the computer and plug
the male end into a properly grounded wall socket or surge protected power strip.
• Make sure the computer power switch (#3) is turned on. Turn on the computer (press
the power switch on the front of the PC) and monitor. (Note: Newer computers are
powered on and start up from a single button on the front of the case.)
• Leave the power switch to the stepper motors (located on the side of the PC) in the
“OFF” position for now.
• Once the desktop icons are displayed, double click the appropriate EMC2 icon. There is
an EMC2 icon for “inch” and “metric” versions of the CNC Mill and Lathe, so choose
the appropriate one. Use the program that corresponds with your leadscrews.
• Wait until the EMC2 program starts up before turning on power to the stepper motors
with the toggle switch on the side of the computer case.
NOTE: If you start the EMC2 and run a program and the screen shows the program is
running but the stepper motors are not moving, make sure both ends of the 25-pin parallel
cable are plugged in as noted above. This is how the computer communicates with the
driver box and is the most common technical assistance call we get. The parallel port
16