
Instructions


Precautions When Turning On the Unit
• As with any piece of electronic equipment, make sure the
power is off before plugging the stepper motor connecting
cord into the control unit.
• If a part has been aligned on the table and the power is
switched off; the part should be realigned after turning the
unit back on before continuing. Electrical “spikes” can cause
the motor to move a few steps when turning it on. The power
can be left on continuously without damage; however, the
controller should be left in “Jog” mode to prevent the motor
from being energized. If you don’t do this, the motor may
be left energized because the motor is electricly locked
in position after a controlled move. Always record your
handwheel settings at a “home” for future use.
Operating Instructions
The Sherline Rotary Table Controller is a self-contained
microprocessor-based controller that will automate the
motion of the Sherline rotary table. Though you can still
crank the table by hand when in the jog mode or when the
controller is turned off, the controller is designed to crank
it for you in precise, measured steps.
Precautions Regarding Manual Mode
When hand cranking the handwheel in the manual mode,
the stepper motor acts as a generator. If you crank the
handwheel rapidly, there is a chance that the control box
electronics could be damaged by the current generated. If
the unit is to be used extensively in the manual mode, it is
recommended that you first turn off the power switch on
the control box and then turn the handwheel no faster than
1 rev/second. Physically unplugging the unit each time is
not necessary and can put undue stress on the plug itself
causing a poor connection and eventual short circuit.
NOTE: You can skip over the Start-Up and Settings
Commands if you are reading htis for the first time. The
factory default settings will work, and these settings are
only needed for advanced operations.
Start-up Commands
There are several utility commands that can be issued
by holding down certain keys when the controller is first
turned on. For example, to enter the SLAVE MODE (to run
the controller with STEP and DIRECTION signals from
another CNC controller) hold down the [ 1 ] key when you
first turn the controller on.
The four start-up commands are:
[ 1 ] - Enter “Slave” mode.
[ 7 ] - Show the revision date of the firmware.
[ 9 ] - Erase all program memory locations.
[MODE] - Erase all program memory locations and initialize
all settings to factory defaults.
These commands are described in detail in the appropriate
section if needed.
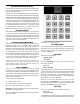
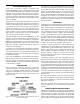
FIGURE 1—The keypad layout
The “Settings” Mode
The next mode after the Program Mode is the Settings Mode.
This allows you to enter some parameters of operation for
the table. These settings are remembered even when you
turn the controller off.
Slow Setting
When the screen displays:
Settings Mode
Press Enter
Press the
[ENTER] key. The screen will then display
something similar to:
Slow: 15
Enter a number
The number after the word SLOW is the minimum feed rate
of the rotary table. This is the speed with which the table
starts each movement. The units are degrees per second.
Whenever the table moves, it starts at the SLOW feed rate
and ramps up to the FAST feed rate. It also ramps down
to the SLOW rate before stopping.
When the screen shows the value you wish to use for
SLOW, press the [ENTER] key. The value will be stored
and remembered for all future operations and used with
the JOG, DEGREES and DIVISION modes.
Fast Setting
The screen will then display something similar to:
Fast: 40
Enter a number
The number after the word FAST is the maximum feed rate
of the table. This is the maximum speed the table reaches
-2-