
Instructions


A good rule now is to take a very light cut (.001") and
convince yourself everything is correct. The real trick of
machining is to do something you have never done before
the “first time”, and you can’t be too careful. A one-minute
check versus three hours or more to start over makes this
a good investment in time. The cut along the spoke is
accomplished by moving only the X-axis back and forth
using the calculated points until you get through the part.
Again, I remind you it may be wise to take a roughing cut
first. Sometimes an undersize (resharpened) end mill is a
good way to rough-cut. Then change to a new end mill for
finish passes. This allows the same handwheel number used
for roughing and finishing.
The rotary cuts are made with the X-axis in its proper
position, and the table rotated counterclockwise. One of
the really neat things in machining happens when using a
rotary table to feed work into an end mill, and I believe it
comes about because of the slow and precise feed that can
be obtained. If a hole you’re cutting requires a bottom, great
finishes can be had from end mills and rotary tables. The
rotary part of the segment only needs to be moved slightly
past the half way point, for the remainder of the segment
will be cut with the Y-axis offset moved out from the column
and the table rotated in a clockwise direction.
It is quicker to cut the first half of all four segments, then
move the Y offset and complete the segments. If you are
going to try something like this for a first project, check
your entire plan out with .001” cuts and be positive you
are correct before making cuts that could scrap your part.
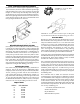
(See Figure 11.)
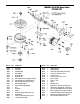
FIGURE 11—Completing the spokes of a wheel.
Cutting Gears with a CNC Rotary Table
I am going to leave it up to you to determine when you
know enough about gears to try to produce one. One of
the best sources for information on gears is Machinery’s
Handbook. Gears are built to a rigid set of rules, and they
are more complex than you might imagine.
I will only try to explain how to cut a simple, low-tolerance
gear. You will also have to determine the blank size, depth
of cut, RPM of the spindle and so on. If you successfully cut
a good gear on your first attempt, be very proud of yourself.
It can be frustrating if you are not organized.
Gears can be cut using a rotary table with a reasonable
amount of precision. In many cases, gears—even
inexpensive ones—are very precise. Gears are usually
produced by “hobbing”. This method uses a cutter that is
similar to a worm gear. The teeth are generated with both
the cutter and the blank turning. In fact, the process looks
just like a worm gear running. Methods like this produce
perfectly shaped teeth that are perfectly spaced. It may be
theoretically possible to produce a perfect gear one tooth
at a time, but it is difficult. Keep in mind, however, that the
level of perfection required in a gear is related to how much
power it will be capable of transmitting. Gears transmitting
a lot of power must be made to much closer tolerances than
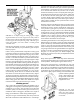
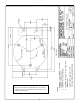
FIGURE 10—Drawing and calculations for cutter paths.
-12-