
Sherline 4400 Lathes - Assembly and Instruction Guide
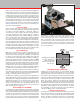
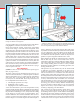
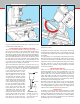
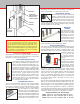
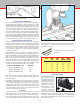
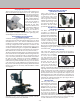
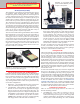
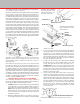
Table Of Contents
- Safety Rules for Power Tools
- An Introduction to the World of Miniature Machining
- Machine Terminology
- The Customer's Responsibility
- Learning More About Machining
- Visit the Sherline Website for the Latest Updates
- Lubrication
- Initial Assembly of a New Machine
- LATHE—Mounting the Crosslide
- All MILLS—X-Axis Handwheel Installation
- Digital Readout Handwheels
- 5000-Series Mills—Mounting the Column
- 2000- and 5800-Series Mills—Assembling and Mounting the Multi-Direction Column
- Mounting the Motor and Speed Control Unit to the Headstock
- Operation of the Motor and Electronic Speed Control
- What to Do if the Motor Suddenly Shuts Down
- Replacing Brushes on a DC Motor
- Mounting the Lathe or Mill to a Board for Stability
- Converting Machines from Inch to Metric and Vice Versa
- ADJUSTMENTS
- Two-Speed Pulley
- Spindle Preload Adjustment
- Gib Adjustment (Lathe and Mill)
- Backlash Adjustment (Lathe and Mill)
- Handwheel Adjustment (Lathe and Mill)
- Saddle Nut Adjustment (Lathe and Mill)
- Adjustment and Use of the Tailstock Gib
- Aligning the Headstock and Tailstock on the Lathe
- Squaring up Your Mill
- Use of Cutting Oils and Lubricants
- General Machining Terms
- Lathe Operating Instructions
- Digital Readouts, P/N 8200
- Live Center, P/N 1197
- Steady Rest, P/N 1074
- Thread Cutting Attachment, P/N 3100
- 3-Jaw, 4-Jaw and Drill Chucks
- Accessories for Your Lathe
- Guide to Approximate Turning Speeds
- Inserted Tip Carbide Tools
- Using the Cutoff or Parting Tool
- Tool Shapes and Grinding Your Own Cutting Tools
- Taper Turning
- Faceplate Turning
- Reaming
- Headstock Drilling
- Tailstock Drilling
- Center Drilling
- Removing Tools from the Morse Taper Spindles
- Turning Between Centers
- Holding the Workpiece
- Inducing Chatter and Learning How to Overcome It
- 3-Jaw Chuck Operation and Maintenance
- Vertical Milling Machine Operation
- Industrial Applications for Sherline Components
- Longer Tables and Taller Milling Columns Available
- Several Reasons to Consider CNC
- Learning About CNC
- CNC and CNC-Ready Sherline Lathes and Milling Machines
- CNC Rotary Indexer (P/N 8700)
- 4" Rotary Table (P/N 3700)
- Tilting Angle Table (P/N 3750)
- Mill Vise Set (P/N 3551)
- Drill Chucks (P/N 3072) and Center Drills
- Fly Cutters (P/N 3052 and P/N 7620)
- Boring Head (P/N 3054/3049)
- Mill Collet Set
- Drill Chuck Holder (P/N 3074)
- 3/8" End Mill Holder (P/N 3079)
- Accessories for Your Milling Machine
- Using the Mill Column Saddle Lock
- End Mills
- Cutting Speeds for Milling
- Determining the Depth of Cut
- Locating the Edge of a Part in Relation to the Spindle
- Using a Dial Indicator
- Standard Milling Versus Climb Milling
- Types of Milling Cutters
- Three Types of Work
- Purchasing Materials in Small Quantities
- Things to Consider Before You Start Cutting
- Locking the Axes
- Securing the Workpiece
- Helpful Tips for Milling
- General Description
- DRO Machine Operations
- Installing Stepper Motors
- Lead Wire Connection and Color Code
- Sherline Stepper Motor Specifications—Nmb Motors
- Using Handwheels on the Stepper Motors
- Stepper Motor Installation Instructions
- Sherline CNC Motor-Mounting Instructions
- Sherline Machine Technical Specifications

-35-
Tilting Angle Table (P/N 3750)
This accessory opens up a great variety of setup options. The
table can be tilted to any angle from 0° to 90°. A hole pattern
in the table is designed to
easily mount the mill vise
or rotary table for holding
parts. A chuck adapter is
included that allows the
3-jaw or 4-jaw chuck to
be screwed directly to
the table as well. Parts
mounted to the table can
be machined or drilled at
precise angles without
tilting the column or
headstock. In the 90° position, the rotary table is held at the
same height as it would be on the P/N 3701 right angle plate,
eliminating the need for that accessory.
Horizontal Milling Conversion (P/N 6100)
for 5000/5400-Series Mills
A number of milling operations require the application of the
cutting tool from the side rather than from the top. A 3/4" thick
aluminum base 10.5" x 12.5" allows a 5000/5400-series mill
column to be mounted separately from the base for a variety
of milling congurations. The headstock is rotated 90° and
work is machined from the side, allowing larger surfaces to be
worked on without having to re-clamp the work. (NOTE: The
greater versatility and capacity of the 2000-series 8-direction
mill eliminate the need for this accessory on those mills.)
The black anodized mounting plate is pre-drilled to mount the
base and column in several possible locations. Alignment bars
and a selection of appropriate bolts are included to make it
easy to accurately relocate the column. Rubber feet insulate
the table for quiet, vibration-free operation. (NOTE: The
column base should be shortened by 2" for best operation.
Instructions are provided with the accessory, or we can shorten
your column for you. The modication is listed as P/N 6101 on
the price list. New mills purchased along with the horizontal
milling conversion can be factory ordered with the column
already split.)
FIGURE 71—One of the congurations possible with the
horizontal milling conversion, P/N 6100.
5400 Mill Column Base with 2000 Ram
(P/N 5640 Short, P/N 5645 Tall)
These rigid columns are
designed for those who have
a 5400-series mill. Each
comes with the 2000-series
ram and gives the versatility
of Sherline’s 2000-series mill
column with it’s large work
area and seven directions of
movement. The tall column
provides more Z-clearance.
Rigid Mill Column Bases for 2000 Mills
(P/N 5605 Short, P/N 5606 Tall)
For those who want the
versatility of Sherline’s
2000/2010 mill column with
it’s large work area and multiple
directions of movement but
have experienced unwanted
column rotation during
extreme machining loads
on the 2000 mill, this new
column oers another option.
The one-piece column absolutely prevents that from happening,
although you do give up the ability to rotate the column ram
from side-to-side.
4" Rotary Table (P/N 3700)
The rotary table mounts to the mill table and provides a
rotary axis for milling. Each increment on the handwheel
represents 1/10° of rotation,
so a circle can be divided
into 3600 segments without
interpolation. Seventy-two
handwheel revolutions rotate
the table one time. It can
be used to mill a radius on
a part, cut a circular slot or
drill precision circular hole
patterns. Used with the right angle attachment (P/N 3701) and
right angle tailstock (P/N 3702), it can also be used to cut gear
teeth. A rotary table used with a mill allows a machinist to
produce virtually any part he can design. On a Sherline mill,
the only limits are size, not complexity. The compact size of
this high quality rotary table also makes it a good choice for
use on larger machines as well, where its size would oer an
advantage in working with small parts. (See Figure 56 for a
photo of the rotary table in use.)
CNC Rotary Tables
The rotary table can also be
purchased in CNC-ready form
with a stepper motor mount
attached ready to accept a
NEMA 23 size stepper motor
of your choice. The CNC-
ready table is P/N 3700-CNC.
If you prefer to purchase a
rotary table with a Sherline stepper motor already attached it
is P/N 8730. The motor is pre-wired with a 5-pin plug that is
ready to plug in to the Sherline driver box (P/N 8760) and go
to work as the 4th axis of your CNC mill system.