
Sherline Lathe User Guide and Specifications


tool bits, correct clearances are essential or "rubbing" can occur.
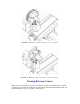
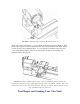
Turning Tools (left and right hand)—Reference to Figure 11 will illustrate the lateral
positioning of this tool. Note the clearance behind the point between the end of the tool
and the work. Insufficient clearance will cause the tool to "rub" and excessive clearance
will produce a ridged or wavy finish due to the small length of tool edge in contact with
the work. This ridging becomes more pronounced with rapid feed. To provide a smooth
finish, the sharp cutting point may be slightly rounded with an oilstone, taking care to
preserve the side clearance underneath this corner.
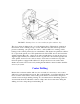
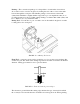
FIGURE 14—Arrows show direction of tool feed in all diagrams.
This tool should not be advanced directly endwise into the work. The depth of cut is set
while the tool is clear of the end of the work. The starting procedure is to advance the
tool until the point just touches the work. Note the reading on the crosslide handwheel,
withdraw the tool slightly and move along until clear of the end of the work. Now
advance the crosslide to the above reading, add desired depth of cut and then feed the tool
along the work piece the desired distance. Withdraw the tool clear of the work, having
noted the reading on the crosslide handwheel, mentally note the reading on the lead screw
handwheel, return the tool to starting position and advance to the previous reading plus
the desired cut.
(Note: Sherline offers optional adjustable "zero" handwheels which allow you to reset the
handwheel to zero...a handy feature often found only on expensive full size machine
tools.)
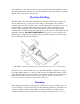
The second feed is now commenced, ceasing at the same previous reading of the lead
screw handwheel. This procedure enables turning to accurate length.
Repeat the procedure until the work has been reduced to within about .010" (0.25mm) of
desired diameter, noting that each .015" (0.4mm) increase in depth of cut will reduce the
work diameter by twice this amount; that is, .030" (0.8mm). For the finishing pass,
advance the tool by the required amount and feed along the work just far enough to gauge