
Sherline Lathe User Guide and Specifications
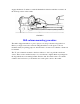
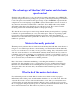

engage the threads. Continue to crank the handwheel clockwise until the crosslide is in
the desired position on the saddle.
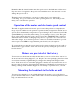
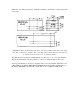
FIGURE 4
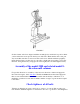
Mill-column mounting procedure
The mill is shipped attached to a piece of plywood to keep it from moving in the box.
Before you begin, remove the screws holding the mill base to the plywood. It was
installed strictly for packing purposes and will need to be removed so that the column can
be installed.
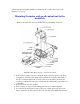
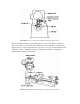
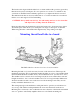
The "Z" axis column is mounted to the base with two 1-3/4" long 1/4-20 socket head
screws. These screws and the hex key tool you will need to tighten them are packaged in
the bag with the motor mounting bracket and drive belt. It is much easier to mount the
column to the base before you mount the motor and speed control to the saddle.