
Instructions
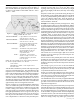
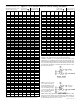

*Notes on cutting certain thread pitches
(Refers to chart on following page.)
Cutting left hand threads coarser than 20 T.P.I. and right
hand threads pitch 5 through 9 T.P.I. will require that you
remove the shaft from the 100-tooth gear and press it in to
the 50-tooth gear. These are threads that wouldn't normally
be cut on a machine of this size. If you don't wish to switch
gears and shafts, an extra gear and shaft can be ordered
from the replacement parts list to eliminate this problem.
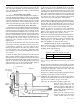
On threads with pitches 5 through 9 T.P.I. you will encounter
a problem with interference between the handwheel and
the 40-tooth gear. A spacer should be made to keep the
handwheel mounted out toward the end of the spindle to
eliminate this interference. This also occurs when making
a 1.0 mm pitch thread on the 4100 metric lathe.
Coarse theads in steel
Threads cut with a pitch coarser than 16 T.P.I. or 1.5mm
begin to push the maximum capabilities of a small lathe
when cut full depth into steel. You may have to slightly move
the tool post occasionally so the entire thread form isn't
being cut at one time. Pitches coarser than this can be cut
into plastic and wood with no problems. Large pitch threads
are also used with multiple lead threads. For example: a 20
T.P.I. double-lead thread would need a 10 T.P.I. setup and
a cutting tool that would form a 20 T.P.I. thread form.
P/N 3100, Pg. 5 of 8
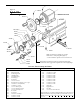
Screw cutting operation review
(Read detailed instructions before proceeding.)
1. Turn or bore stock to proper diameter.
2. Remove the motor assembly from the lathe by unscrewing
the two socket head cap screws that hold the motor bracket
to the headstock.
3. Install the 60° brazed tip carbide thread cutting tool in the
tool post.
4. Place the tool bit at the starting point of the thread and set
it for a .003" depth of cut.
5. Engage the lever at the base of the lathe by turning the
handle clockwise. Turn lead screw handwheel back and
forth slightly until full engagement occurs.
6. Turn the spindle crank handwheel until the tool bit has
traveled the full length of your intended thread.
7. Back the crosslide out to clear the tool from the thread.
8. Turn the crank handwheel backwards until the tool bit has
traveled past the starting point of the thread.
9. Return the crosslide to its original position and advance it
an additional.002" in depth.
10. Repeat steps 6, 7, 8, and 9 until the full thread depth has
been cut. Using cutting oil will make cutting easier and will
give a better finish.
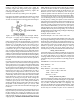
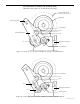
Notes regarding using the threading attachment
with a digital readout
To keep the drive gear from scratching the tachometer
decal on your pulley, make sure the shim washers (P/N
31050) are in place to space the shaft gear away from the
pulley. Then adjust the drive gear so that it is centered or
slightly off-center away from the pulley so that it can't
contact the decal. As an alternative, a piece of thin steel
shim stock could be cut like a large washer and inserted
between the gear and the pulley for protection.
Note also that the addition of DRO handwheels to your lathe
will cause the long leadscrew to be moved slightly to the
right. This will require the use of a slightly longer sliding shaft
when using either the thread cutting attachment or the P/N
3001/3011 power feed. When purchasing a DRO for use
with a machine using either of these attachments, be sure to
mention that you have these attachments. You will be
supplied with a longer version of the P/N 15090 sliding. The
longer shaft is P/N 81509 should you need to order it.
Joe Martin, President and Owner,
Sherline Products Inc.