
Instructions

P/N 3100, Pg. 4 of 8
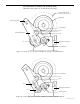
needs to be finger tight and should not be used when it
interferes with the secondary support arm. Adjust the
secondary support arm and gear for proper engagement
with the mating gears. When satisfactory, tighten the
retaining screw and pivot screw.
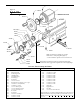
Install the crank wheel by it sliding it over the spindle.
Line up the slot with the protruding sheet metal screw head
and tighten down the crank wheel set screw using a hex
wrench. A few drops of oil on moving parts will be helpful.
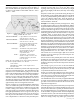
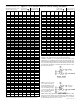
Figure 4—Gear Setup Diagram for Example. NOTE:
See Figure 7 on page 8 for a detailed setup drawing.
Cutting a thread for practice
I believe the time has come to “HAVE AT IT." We will start
by chucking up a piece of aluminum and turning it to 1/4"
diameter. Let’s cut 28 TPI on it. Be sure to have a nut to
check it with. Looking at the chart we see we need a gear
“A” (100T) on the spindle, driving a gear “B” (100T), that
is attached to the gear “C” (20T), driving the lead screw
gear “D” (28T), using the idler gear “E” (40T) that mounts
on the swing arm. The gears should mesh so they run “free”
and have a reasonable amount of backlash. NOTE: All gear
trains have some “backlash” and it will not affect the quality
of the thread, but it does have to be allowed for. This is why
the tool has to be backed out before the lathe spindle is
reversed.
Over 90% of the threads cut on a lathe of this type will have
a pitch less than .070, and be less than 3/8" long. Now and
then you may have to cut a fairly course thread (more than
.070" pitch), and it is a good idea to “rough out” the thread
by moving the tool post slightly to the left between passes.
This keeps the tool from having to cut on both sides of the
thread at the same time. On a standard lathe, the tool is
advanced by the compound rest which is set at 29°. This
allows only one side of the tool to cut and lessens the load
considerably. The final cut is then taken with the crosslide
being advanced to “clean up” the thread. We can get the
same effect by moving the tool post. When cutting fine
threads you can get away with cutting “straight in”. The
crank drive gives you the “feel” and a precise method of
stopping needed in single-pointing fine threads. Cranking
the spindle counter-clockwise gives you reverse. This
allows you to cut the entire thread without disengaging the
leadscrew.
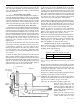
Establish the depth of the first cut by bringing the tool in to
the point where it just touches the part surface. Write down
the dial setting. Now engage the leadscrew lever. The
leadscrew may have to be turned back and forth a little while
applying slight pressure on the lever in order to get it to
engage properly. DO NOT DISENGAGE THE LEVER
UNTIL THE THREAD HAS BEEN COMPLETELY
CUT. With the tool moved past the end of the part, advance
the tool inward .003" for first cut. Turn the spindle counter-
clockwise until the desired length of thread has been cut.
Back the tool out until it is completely clear of the part.
Crank the spindle clockwise until the tool is at the original
starting point. Advance the tool to its last point plus .002".
I’ve always found it useful to write these dial settings down
too. It is amazing how fast you can forget one! Now take the
second pass by cranking the spindle counter-clockwise.
The amount the tool should be advanced from this point on
should be governed by the amount of force it took the last
pass. The cut will get progressively heavier each time the
tool is advanced. Remember, you can’t ruin your part by
taking too light a cut. To figure what the total amount the tool
should be advanced if you are using a sharp “vee” form tool
(standard form of tool used in single pointing threads) simply
multiply the pitch times .758.
Example: Pitch of 28 TPI = 1/28
Pointed tool depth = P x .758 = 1/28 x .758 = .027
If you are not too good with math and don’t like to do it, just
keep cutting and looking at the flat on the top of the thread.
When the flat is 1/8 the pitch, the nut should fit. Either way,
check it long before you think it is finished to be on the safe
side until more experience is gained. The last two passes
should be repeats of previous dial settings to clean up
threads. Not too hard was it? No matter what type of
threads you may cut, the basic method will remain the same.
Cutting internal threads
Internal threads are very seldom cut full depth. To figure the
hole size you should start with, take the pitch of thread you
are cutting and multiply it by 1.083. Then subtract the
resulting number from the major diameter. To figure the
total depth using a sharp pointed 60° tool, multiply the pitch
by .65.
EXAMPLE: To cut an internal 1.5-28 TPI:
Major Diameter = 1.5"
P = 1/28 = .036"
Major Diameter - (P x 1.083) = Hole Size
1.500" - (.036" x 1.083) = Hole Size
1.500" - .039 = 1.461"
Hole size = 1.461"
Cutting double lead pitches
A double lead thread could be cut by picking change gears
that are one-half the pitch and indexing the “A” gear 180°
after cutting the first thread to depth. NOTE: There isn’t any
way to check a double lead until it is completely cut,
therefore, the depth must be figured mathematically. It has
always been fun for me to do jobs like this, not necessarily
because they were needed, but just to see if I could do it!