
Instructions


Grinding, Pg. 2 OF 4
little discoloration doesn’t eect the tool life in tool room
use. What you should worry about is not burning yourself
or grinding the tips of your ngers o! Concentrate on
holding the 10° angle while moving back and forth. We’ll
give this edge a nal sharpening later; it’s time for side 2.
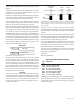
Grinding side 2 of the tool
Top of Tool
Less than 90°
FIGURE 6—Grinding side 2.
The reason angle B is ground less than 90° is to allow the
tool to get into corners.
Part
Tool
FIGURE 7—Properly ground tool
cutting into a corner
Side 2 is ground the same way as side 1, moving the tool
back and forth until you have a point. After you get side 2
ground, cool the tool in the cup of water.
The next step is to learn another aspect of tool grinding. It’s
important to know when you have ground the surface up to
the cutting edge, especially when re-sharpening lathe tools.
Take the tool you just ground and bring it up to the wheel
at a slightly dierent angle than you just ground for this
experiment. Watch the point that touches the wheel rst and
you will notice that the sparks will bounce o the cutting
edge only where the wheel has ground from top to bottom.
Tip
Sparks
Sparks at
tip of tool
FIGURES 8A—Tip not yet ground at and 8B, Tool ground at
all the way to the tip.
This tells you when the tool has been sharpened without
taking it away to look which allows you to grind at and
true surfaces. If you sharpen a tool for a Sherline lathe, use
a 1/4" square tool blank and keep the cutting edge up to the
top of the blank; the tool will come out on center without
shims. You will have to be precise grinding the third side
to accomplish this.
When working around grinders it is an absolute
necessity to wear EYE PROTECTION. Grinding debris
is thrown out at high velocities and can damage not only
eyes, but also expensive glasses. Wear safety glasses or
a full face shield.
If you’ve never sharpened a tool, take a close look at how
ours are sharpened. Let’s duplicate the right hand tool on the
opposite end of the blank. Be careful you don’t cut yourself
on the blank or the sharpened end while working with it.
First dress the wheel by taking the dresser and setting it on
the tool support square with the wheel and while applying
a light pressure move the dresser back and forth with the
grinder running. Unless the wheel is in bad shape, it should
be ready to use in a few passes.
Grinding Side 1 of the Tool
Turn o the grinder and set the tool support for approximately
7° if you haven’t done it yet. If you’re not good at guessing
at angles use a pre-sharpened Sherline tool to set the angle.
Metal cutting tools are very tolerant on angles. I’ve always
found wood cutting tools more dicult to sharpen. Too little
angle and the “heel” of the tool will rub, too much angle
will cause the tool to “dig in” and chatter.
Heel
Tip
FIGURE 3—Heel of the tool.
Have a cup of water handy to cool the tool with and set the
blank on the tool rest and start grinding side 1.
Grinding Wheel
Tool Rest
10°
FIGURE 4—Grinding Side 1.
Top of Tool
(NOTE: Because of 7°
angle on tool rest, side of
tool is actually cut rst.)
1/4" -3/16"
FIGURE 5—Properly
ground side 1.
Move the blank back and forth across the face of the wheel
until you have ground a 10° angle on approximately 3/16"
(4 mm) of side 1.
This is where the “positive approach” comes in. Unless
you push the tool into the wheel with enough pressure, the
tool will bounce around and you’ll never get a good at
cutting surface. It isn’t necessary to worry about getting
the tool too hot. Modern day tool steels don’t anneal and a